
Introduction
Pot roast is a classic comfort food that warms both the heart and the table. It’s a simple dish where beef, vegetables, and rich flavors come together in one pot. The result? A tender, juicy meal that’s perfect for Sundays or any cozy dinner.
In this guide, you’ll learn how to make the best pot roast every time. I’ll show you how to choose the right cut of beef, pick the best ingredients, and prepare everything step by step. You’ll also get helpful tips, tasty variations, and serving ideas to complete your meal.
Best Cut of Meat for Pot Roast: What to Use for Juicy and Tender Results
Once you’ve chosen the perfect cut of meat for your pot roast, follow this method to ensure a tender and juicy result every time.
Why Chuck Roast Is the Best Meat for Pot Roast
When it comes to making the best pot roast, choosing the right cut of beef is key — and chuck roast is hands down the top choice. This cut comes from the shoulder area of the cow, which is a well-used muscle. That means it’s full of connective tissue, marbling, and beefy flavor, all of which are essential for a tender and flavorful roast.
Chuck roast might be tough if cooked quickly, but it transforms beautifully with low and slow cooking methods like braising. As it cooks, the collagen breaks down into gelatin, making the meat fall-apart tender and the broth rich and silky.
Unlike leaner cuts like round or sirloin, chuck roast has enough fat to stay moist during long cooking times. It also holds its shape well, so it doesn’t turn mushy — even after hours in the oven or slow cooker.
If you’re aiming for juicy, flavorful, melt-in-your-mouth pot roast, chuck roast is your best bet. Look for a cut with visible marbling and a deep red color for the best results.
Understanding Marbling and USDA Beef Grades for Maximum Flavor
To cook a truly delicious pot roast, it’s not just about picking the right cut — it’s also about understanding the quality of the meat. Two key factors that influence the flavor and tenderness of your roast are marbling and USDA beef grades.
Marbling refers to the small streaks of fat distributed throughout the muscle of the meat. This fat melts during cooking, adding both moisture and rich flavor to your pot roast. More marbling usually means a more tender and flavorful result, especially with slow-cooked dishes like pot roast.
When shopping for beef, you’ll often see a USDA grade label. These grades are based on marbling, color, and overall meat quality:
- USDA Prime – The highest grade with the most marbling. Ideal for special occasions and yields incredibly juicy, flavorful pot roast.
- USDA Choice – Slightly less marbling than Prime but still a great option for everyday cooking. It’s widely available and gives excellent results.
- USDA Select – Leaner with less marbling. While it’s more budget-friendly, it may turn out drier unless cooked very carefully.
For pot roast, USDA Choice is often the sweet spot — it’s tender enough for long, slow braising but still affordable. However, if you can get your hands on Prime, it’s worth the upgrade for a special meal.
By understanding marbling and beef grades, you’ll be able to choose meat that not only cooks well but delivers maximum flavor and tenderness every single time.
Where to Buy High-Quality Beef for Your Pot Roast Recipe
The success of your pot roast starts with the quality of your beef — and where you buy it can make a big difference. Whether you’re aiming for a cozy weeknight meal or a Sunday family dinner, choosing high-quality meat will elevate the flavor, tenderness, and overall satisfaction of your dish.
Here are some of the best places to find great beef for pot roast:
1. Local Butcher Shops
Local butchers are often your best bet for sourcing fresh, well-trimmed cuts like chuck roast. They can guide you on which cuts are best for braising and may even offer custom cuts or recommendations based on your recipe. Many butchers also sell dry-aged beef or grass-fed options, which can add unique depth of flavor.
2. Farmers’ Markets and Local Farms
Buying directly from farmers or small-scale producers ensures you get locally raised, often hormone-free and ethically sourced meat. These options may cost a bit more but often have superior flavor and texture. Plus, you’re supporting your local community.
3. Grocery Stores
Most grocery stores carry USDA-graded beef, including chuck roast. Look for USDA Choice or Prime, and check for good marbling. Stores with a full-service meat counter may let you select your preferred roast or cut it to your desired size.
4. Online Meat Retailers
There are several reputable online butchers and meat delivery services that offer premium beef, including pasture-raised or organic chuck roasts. Companies like Porter Road, Crowd Cow, or ButcherBox allow you to choose the exact type and quality you want, and they deliver straight to your door.
Tips for Buying Beef
- Always look for bright red meat with visible marbling.
- Avoid cuts that are too lean — fat is essential for moisture and flavor in pot roast.
- If you’re buying in bulk, freeze extras in airtight packaging to preserve quality.
Investing in good beef means your pot roast will turn out not just edible — but exceptional.
Must-Have Ingredients for a Flavorful Pot Roast with Vegetables
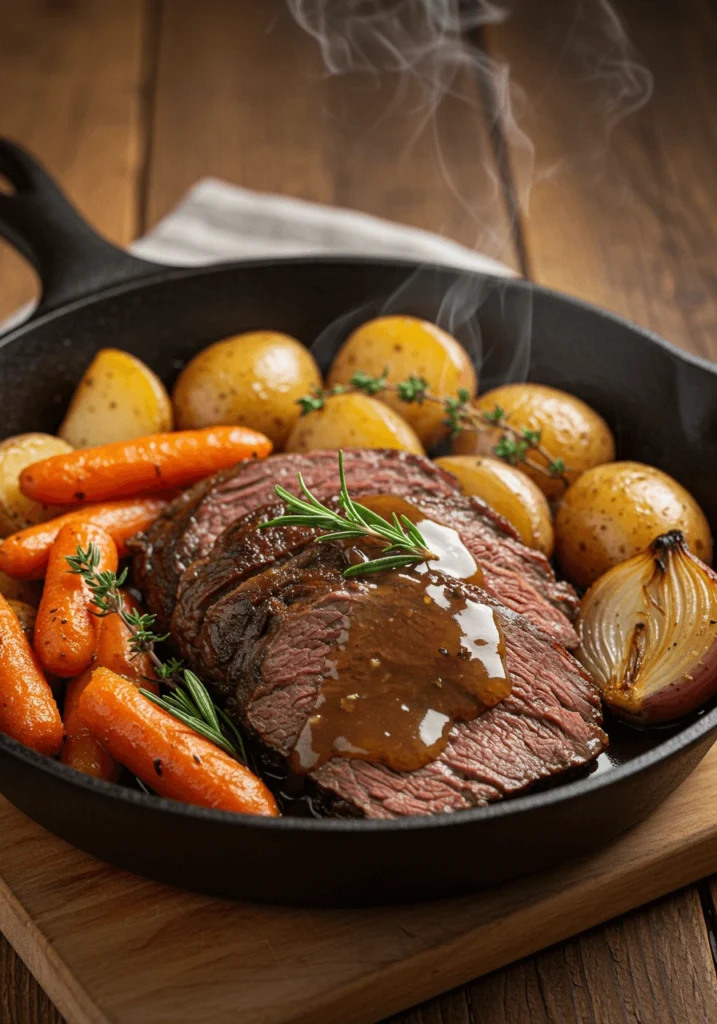
Classic Pot Roast Vegetables: Carrots, Potatoes, Celery, and Onion
No pot roast is complete without a medley of hearty vegetables simmered to perfection alongside the meat. These classic vegetables don’t just add color and texture to the dish — they soak up all the savory juices from the roast, turning tender and flavorful by the time dinner is served. Let’s break down each veggie and why it earns a spot in the pot:
Carrots
Carrots add a hint of natural sweetness that balances the rich, meaty flavors of the roast. Cut them into large chunks so they don’t become too soft during the long cooking process. You can use regular carrots, peeled and cut, or baby carrots for convenience.
Potatoes
Potatoes bring comfort and heartiness to pot roast. They absorb the delicious beefy broth and help make the meal feel complete. Yukon Gold or red potatoes are best — they hold their shape and have a buttery texture. Avoid russet potatoes, as they tend to fall apart when slow-cooked.
Celery
Though often overlooked, celery adds a mild earthiness and aromatic depth to the roast. Its fibrous structure breaks down during cooking, helping to enrich the flavor of the broth. Slice celery stalks into thick pieces to prevent them from getting mushy.
Onion
Onions are essential for building flavor. As they cook down, they release their natural sugars and become soft, sweet, and rich in umami. You can use yellow, white, or sweet onions, depending on your taste. For even deeper flavor, consider sautéing the onions before adding them to the pot.
Bonus Tip
Want extra flavor? Add the vegetables about halfway through cooking. This keeps them tender, but not overdone, and ensures they still have some texture when served.
These classic vegetables don’t just complement the pot roast — they help create a full, satisfying meal in one pot. No extra side dish prep required!
Flavor Boosters for Pot Roast: Broth, Garlic, Herbs, and Worcestershire Sauce
While the meat and vegetables form the base of a delicious pot roast, the flavor boosters — ingredients like broth, garlic, herbs, and Worcestershire sauce — are the secret weapons that elevate your roast from good to extraordinary. Let’s dive into why these ingredients are essential and how they work together to create a deeply savory, aromatic dish.
Broth: The Flavorful Foundation
Broth is crucial for braising your pot roast and creating a rich, flavorful sauce. You can use either beef broth or chicken broth, depending on your preference. For a more intense flavor, homemade beef broth or stock is ideal, as it’s packed with rich gelatin and umami. Store-bought options are convenient but look for low-sodium varieties to control the salt level. The broth not only keeps the roast moist during long cooking but also helps infuse the meat and vegetables with deep flavor.
For an added dimension, you can mix in wine (red or white) or even a splash of beer to enhance the overall taste profile.
Garlic: The Aromatic Boost
Garlic is a must for flavoring the pot roast, adding a fragrant, savory note that complements the beef and vegetables. Whole garlic cloves, when added to the pot, infuse their flavor slowly throughout the cooking process. For even more flavor, you can smash the garlic with the side of a knife or chop it up to release more of its natural oils. If you prefer a milder garlic flavor, roast the garlic in the oven before adding it to the pot.
Herbs: A Fresh, Earthy Flavor
Herbs are essential for that aromatic, earthy flavor that makes pot roast so comforting. The classic herb pairing includes rosemary, thyme, and bay leaves. These herbs have the perfect balance of piney, earthy, and slightly sweet notes that elevate the beef.
- Rosemary pairs wonderfully with beef, giving a woodsy, savory flavor.
- Thyme brings a gentle, earthy fragrance that complements the rich flavors of the meat and vegetables.
- Bay leaves add a subtle depth, so be sure to remove them before serving.
For a richer flavor, you can also use fresh herbs instead of dried. Fresh rosemary and thyme will have a stronger flavor, and their oils will release into the broth, making the roast even more aromatic.
Worcestershire Sauce: Umami Punch
This tangy, savory sauce is a secret weapon in any pot roast recipe. Worcestershire sauce provides a deep umami flavor that rounds out the savory notes of the beef and brings everything together. It has a tangy, slightly sweet, and salty profile that adds layers of complexity to the broth. Just a few dashes can transform an ordinary pot roast into a deliciously rich meal.
You can also experiment with adding soy sauce for an extra depth of flavor if you want more umami.
Bonus Tip
For a more intense flavor, let the roast marinate in the broth, garlic, and Worcestershire sauce for a few hours before cooking. This allows the flavors to soak in even more deeply.
By incorporating these flavor boosters, you create a pot roast that’s not only juicy and tender but also full of deep, savory goodness with every bite.
Optional Ingredients for a Gourmet Pot Roast: Red Wine, Mushrooms, Tomato Paste
While a classic pot roast is already delicious with the basics, there are several optional ingredients you can add to elevate your dish to a gourmet level. These ingredients not only bring depth of flavor but also add layers of complexity that will wow your guests. Let’s take a closer look at these elevated options:
Red Wine: A Rich, Robust Flavor
Adding red wine to your pot roast is a tried-and-true way to deepen the flavor profile and create a more complex, rich sauce. Wine helps tenderize the meat by deglazing the pan and breaking down some of the tougher fibers in the roast. As the wine cooks, it evaporates, leaving behind its fruity, tannic, and earthy flavors. This results in a bold, savory broth that pairs beautifully with the beef.
The best wines for pot roast are dry red wines with enough acidity and structure to complement the richness of the beef. Look for Cabernet Sauvignon, Merlot, Zinfandel, or Pinot Noir. These wines will enhance the natural flavors of the meat without overpowering them. You don’t need to splurge on an expensive bottle — just avoid the super cheap options, as they may introduce an off-putting taste.
You can add the wine early in the cooking process, allowing it to blend seamlessly with the broth and vegetables, or you can pour it in during the browning phase for an intense depth of flavor right from the start.
Mushrooms: Earthy Umami
Mushrooms are a perfect addition to a pot roast for their earthy, umami-rich flavor. They not only enhance the broth but also add an extra layer of texture to the dish. Both button mushrooms and cremini mushrooms work well, but if you’re feeling adventurous, you can use more exotic varieties like shiitake, portobello, or oyster mushrooms for a gourmet touch.
Mushrooms release their natural moisture as they cook, which melds beautifully with the beef juices and creates a more complex, velvety sauce. You can sauté them beforehand to get a bit of caramelization and maximize their flavor, or simply add them directly into the pot along with your other vegetables.
Tomato Paste: Deep, Savory Sweetness
Tomato paste is a secret ingredient that adds richness and depth to the overall flavor of your pot roast. When sautéed in a bit of oil or added to the pot, tomato paste caramelizes and releases a deep, savory sweetness that balances out the richness of the beef and other ingredients.
It also helps to thicken the broth, making it more luscious and creating a more satisfying sauce to pour over the finished roast. A small tablespoon or two is all you need to get that perfect balance. If you’re cooking with red wine, the tomato paste will integrate beautifully, enhancing the acidity and creating a more round, harmonious flavor profile.
Bonus Tip
If you want to make the dish extra decadent, consider adding a splash of heavy cream or butter toward the end of cooking. This will turn the broth into a luxurious gravy, perfect for spooning over mashed potatoes or serving on the side.
By incorporating these optional ingredients, you take your pot roast to the next level, turning a comforting family dish into a gourmet experience that’s perfect for special occasions or simply impressing your dinner guests.
How to Cook Pot Roast in the Oven (Step-by-Step Guide)
Prepping the Meat and Vegetables for Oven Roasting
Proper preparation is key to achieving a tender, flavorful pot roast with perfectly cooked vegetables. The way you prep your meat and vegetables before they hit the oven will influence both the texture and the taste of your dish. Here’s a step-by-step guide to ensure your roast comes out perfectly every time:
Preparing the Meat:
1. Patting the Meat Dry:
Before you season or brown your pot roast, pat the meat dry with paper towels. This step is essential because moisture on the surface can interfere with browning, which is critical for developing a deep, savory flavor. Drying the meat allows it to brown more evenly, creating a delicious, flavorful crust that enhances the overall taste of the roast.
2. Seasoning the Meat:
Once your roast is dry, it’s time to season. Generously coat the entire surface of the meat with a mixture of salt, pepper, and your favorite herbs (like rosemary, thyme, or garlic powder). If you want to take it a step further, you can also rub on a bit of olive oil or mustard for an extra layer of flavor. Don’t be shy with the seasoning, as the meat will absorb much of the flavor during the slow cooking process.
For an even more intense flavor, consider marinating the roast in your seasoning mix for a few hours or overnight. This allows the flavors to penetrate deeper into the meat.
3. Searing the Meat:
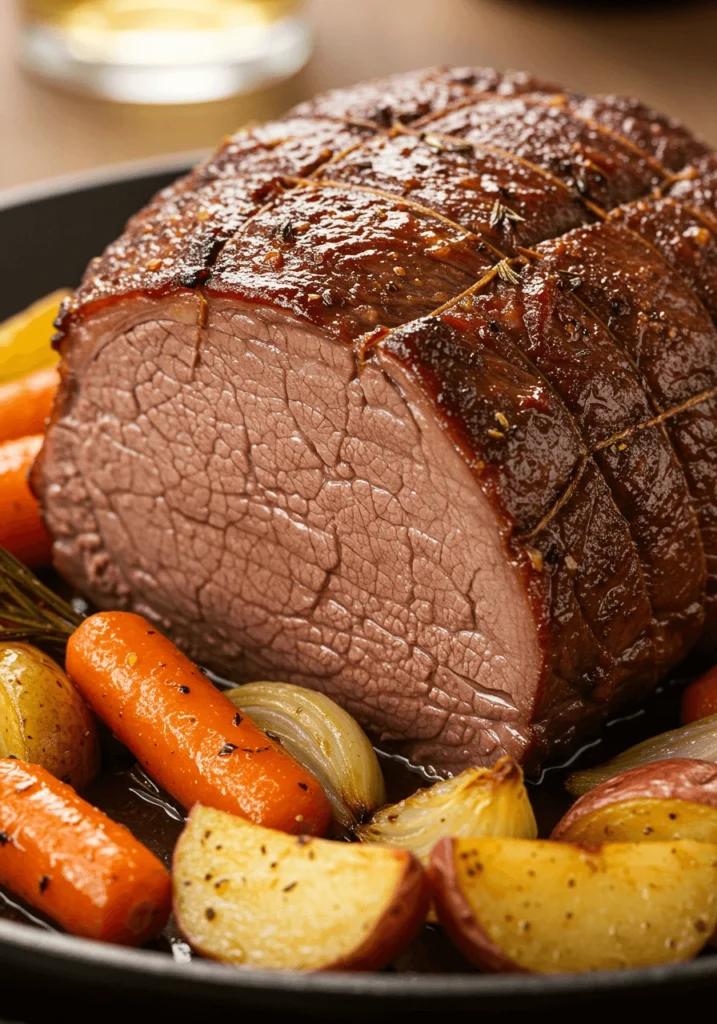
Before placing the meat in the oven, it’s highly recommended to sear it in a hot pan on the stove. This step creates a beautiful, brown crust on the outside of the roast, which not only adds flavor but also seals in juices. Heat a heavy-bottomed skillet (preferably cast iron) over medium-high heat and add a little oil. Once the pan is hot, add the roast and sear it on all sides — this usually takes 3-4 minutes per side.
Searing is one of the most important steps in achieving that classic roast flavor. Don’t skip it!
Preparing the Vegetables:
1. Cutting the Vegetables:
The size and uniformity of your vegetable cuts can affect the cooking time and texture. Carrots, celery, and onions should be cut into larger, even-sized pieces to ensure they cook at the same rate as the roast. Aim for chunks that are big enough to hold their shape during the long roasting process — roughly 2 to 3-inch pieces work well. Potatoes should be cut into similar-sized chunks to prevent overcooking or undercooking any one vegetable.
2. Pre-cooking the Vegetables (Optional):
While some prefer to add the vegetables directly to the roasting pot, pre-cooking them for a few minutes in a skillet can enhance their flavor. Sautéing the vegetables in a little oil or butter caramelizes their natural sugars, deepening the flavor and adding a slight crispness before they begin braising in the pot. This step works especially well for onions and celery.
3. Seasoning the Vegetables:
Just like the meat, your vegetables benefit from a good seasoning. Toss them in olive oil, salt, and pepper, and add any herbs you plan to use for the roast (such as thyme, rosemary, or bay leaves). You can also add a touch of garlic (whole cloves or minced), which infuses the vegetables with extra flavor during roasting.
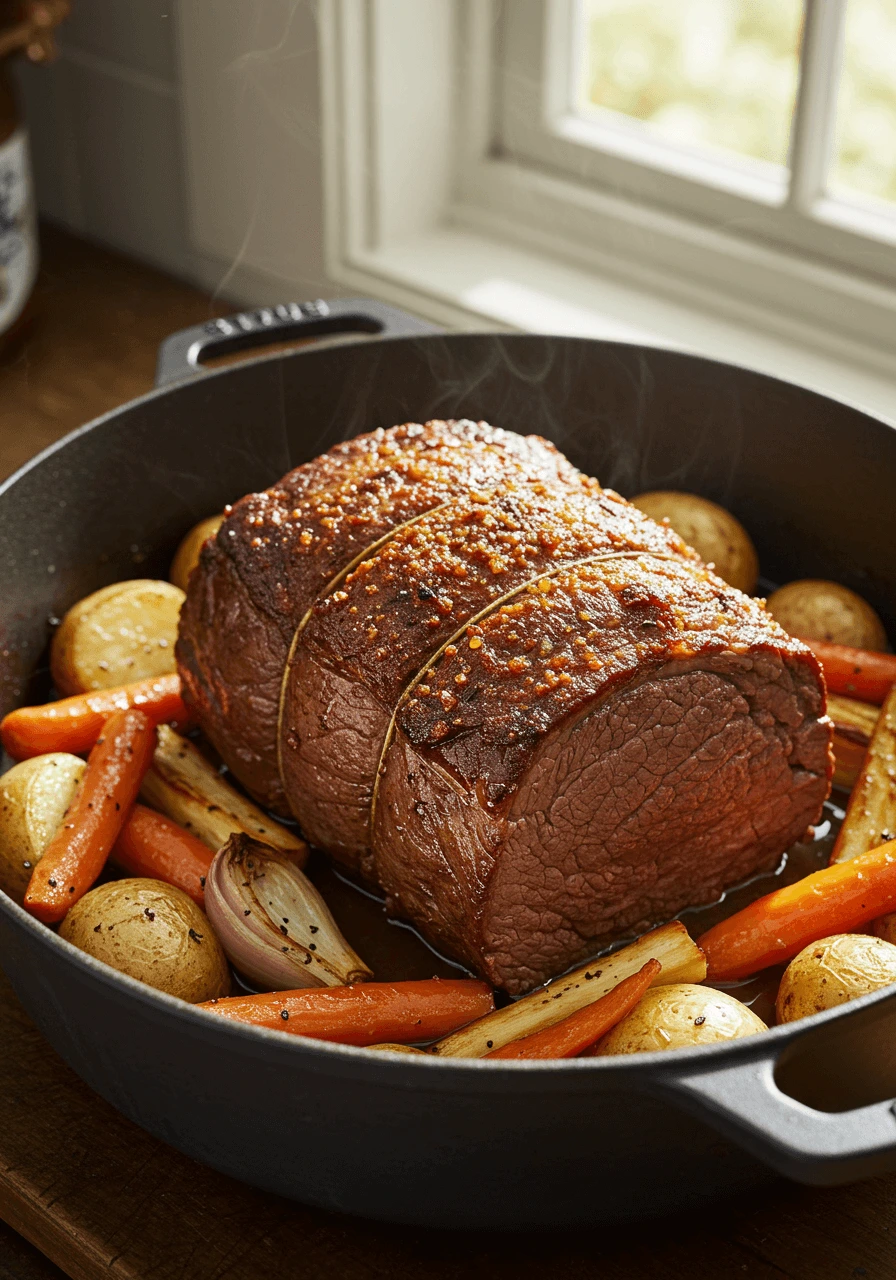
Arranging Everything in the Roasting Pan:
Once your meat is seasoned, seared, and ready, and your vegetables are prepped, it’s time to arrange everything in the roasting pan:
- Layering: Place your vegetables first in the pan to create a foundation. The roast will sit on top of them, allowing the meat to cook evenly while the vegetables soak up all the flavorful drippings.
- Placing the Roast: Place the meat on top of the vegetables in the roasting pan. You want the meat to be elevated slightly off the vegetables, so it can brown properly on all sides and allow the drippings to flavor the vegetables.
Bonus Tip: If you prefer, you can tie the roast with butcher’s twine to ensure it holds its shape during the cooking process, especially for larger roasts. This step helps maintain an even cooking rate and can make slicing the meat later easier.
Final Thoughts on Prepping:
The prep work may take some time, but it’s well worth it. Properly preparing your meat and vegetables sets the stage for a flavorful, juicy pot roast that everyone will love. With a little patience and attention to detail, your pot roast will turn out perfectly every time, with tender meat and vegetables soaked in savory, aromatic goodness.
How to Sear Beef Roast for Extra Flavor Before Braising
Searing the beef roast before braising is a crucial step that enhances both the flavor and texture of the dish. The browning process caramelizes the natural sugars in the meat and helps to create a rich, flavorful crust. This golden-brown crust not only adds texture but also helps to seal in the juices, keeping the roast tender and moist during the long cooking process. Let’s break down the process of searing and why it’s essential for a perfect pot roast.
1. Choose the Right Pan and Heat It Up:
Choosing the right pan is key to a successful searing. You want a heavy-bottomed skillet or Dutch oven that can retain heat and distribute it evenly. The best options are cast iron skillets or enamel-coated Dutch ovens. These pans can withstand high heat and help create a crispy, golden crust on the roast.
Before you begin searing, preheat the pan over medium-high heat for several minutes. The pan should be hot enough that a drop of water sizzles immediately when added, but not smoking. The goal is to get a good sear without burning the meat or oil.
2. Pat the Meat Dry:
This step is often overlooked, but it’s one of the most important. Moisture on the surface of the meat will steam it rather than sear it. To ensure a crisp, golden crust, pat the beef roast dry using paper towels or a clean kitchen towel. Removing moisture allows for better contact between the meat and the hot surface, which is essential for achieving that beautiful brown crust.
3. Season the Meat:
While the pan is heating, season the beef roast with salt, pepper, and any other spices or herbs you prefer. Seasoning the meat directly before searing ensures the flavors adhere to the surface and will create an even, savory layer of seasoning. Salt helps to draw out moisture (which you’ve already blotted away), allowing the roast to develop that rich seared flavor.
For extra flavor, you can also rub the roast with garlic powder, onion powder, or smoked paprika. These seasonings will caramelize along with the meat, adding depth and complexity to the crust.
4. Add Oil to the Pan:
Next, add high-smoke-point oil to the hot pan. The best oils for searing are vegetable oil, canola oil, or grapeseed oil. These oils can withstand high temperatures without burning. You only need a small amount — about 1-2 tablespoons — to coat the bottom of the pan.
Swirl the oil around to make sure the surface is evenly covered. Once the oil starts shimmering and you can see a faint wisp of smoke, the pan is ready for the roast.
5. Sear the Meat:
Place the beef roast in the pan, fat side down first (if it has a fat cap). This will help render the fat and create a crispy layer of flavor. Let the meat sear without moving it for 3-4 minutes on each side, depending on the size of the roast. The goal is to achieve a dark golden-brown crust without burning the meat or the oil.
While searing, resist the urge to move the roast around in the pan. The longer the roast stays in contact with the hot pan, the more even the crust will become. If you need to sear multiple sides, rotate the roast using tongs or a spatula, making sure to get all sides evenly browned.
6. Don’t Overcrowd the Pan:
If you’re searing a large roast, avoid overcrowding the pan. Overcrowding can lead to steaming rather than searing, as the moisture released from the meat and vegetables will reduce the pan’s temperature. If needed, sear the roast in batches. You can always sear in two parts and then combine the seared pieces into a larger pan for braising.
7. Rest the Meat After Searing:
Once all sides of the roast are nicely browned, remove it from the pan and set it aside on a plate. Let it rest for a few minutes to allow the juices to redistribute. This helps keep the meat juicy throughout the braising process.
Bonus Tip:
For even more flavor, you can deglaze the pan after searing. Once the roast is removed, pour in a small amount of broth, wine, or even water, and scrape up any browned bits left on the bottom of the pan. These flavorful bits, known as fond, will mix into the braising liquid, creating an even more savory base for your pot roast.
Why Searing Matters:
Searing your beef roast is not just for color or aesthetics; it creates a Maillard reaction, a chemical process that produces complex flavors and aromas that can’t be achieved through slow cooking alone. It’s this deep, caramelized flavor that gives your pot roast that mouthwatering, savory essence. This step is key for ensuring that your roast has a rich, delicious exterior, which complements the melt-in-your-mouth tenderness that comes from braising.
Oven Pot Roast Cooking Time and Temperature for Perfect Doneness
Cooking a pot roast in the oven is all about achieving that perfect balance between tenderness and juiciness. The key to a great pot roast is low and slow cooking, which allows the meat to break down and become melt-in-your-mouth tender. Getting the right oven temperature and cooking time is critical to reaching that perfect doneness. Let’s dive into the details of how to achieve that with ease.
1. Ideal Oven Temperature for Pot Roast:
The best temperature for cooking pot roast in the oven is low and slow — generally, 325°F (165°C) is the sweet spot for most cuts of meat used in pot roast. This temperature is high enough to cook the roast thoroughly, yet low enough to prevent the meat from becoming tough or dry.
Why 325°F?
- Even cooking: At this temperature, the meat cooks evenly, allowing time for the collagen in tougher cuts (like chuck roast) to break down into gelatin, resulting in tender, juicy meat.
- Gentle braising: Pot roast is typically cooked in liquid (broth, wine, or a combination), and cooking at a low temperature helps to gently braise the meat, ensuring it stays moist and tender without overcooking.
2. Cooking Time:
The cooking time for pot roast varies based on the size of the roast and the type of cut you’re using, but here’s a general guideline for most beef pot roasts:
- 3-4 lbs of meat: Expect a cooking time of about 3 to 4 hours at 325°F.
- 5-6 lbs of meat: This size usually requires around 4 to 5 hours of cooking time.
The roast should cook for about 30 minutes per pound at 325°F. However, these times are just guidelines. The best way to ensure your pot roast is cooked perfectly is to check its internal temperature using a meat thermometer.
3. Checking for Doneness:
While the cooking time is important, internal temperature is the best indicator of doneness. Use a meat thermometer to ensure your roast is cooked to your desired level:
- For a tender, fall-apart roast (ideal for pot roast), aim for an internal temperature of around 190-205°F (88-96°C). This temperature allows the collagen in the meat to break down completely, making the roast incredibly tender and easy to shred.
- If you prefer a slightly firmer roast that can be sliced cleanly, aim for 150-160°F (65-71°C). At this range, the meat will still be tender, but it will maintain its shape better when sliced.
4. The Importance of Resting:
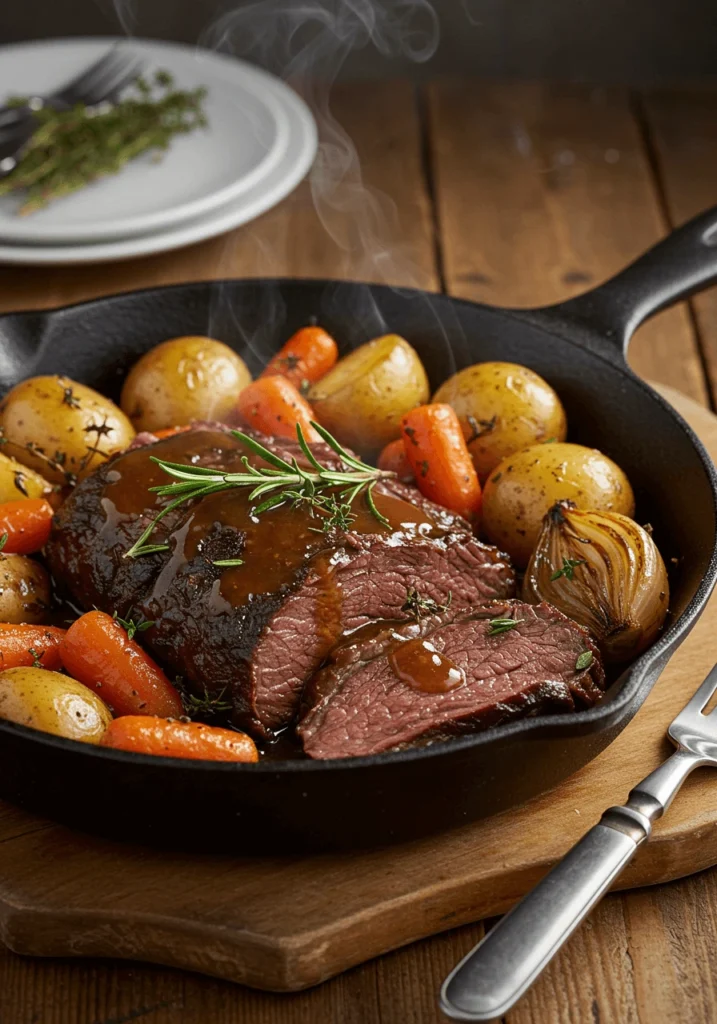
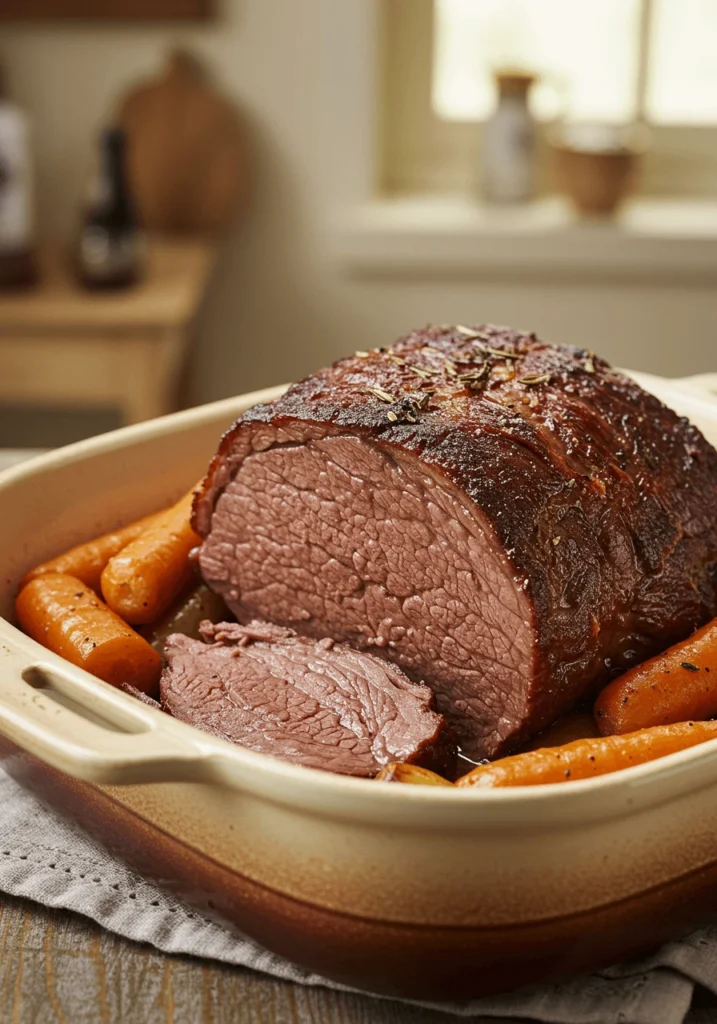
Once your pot roast has reached the desired internal temperature, remove it from the oven and let it rest for at least 15-20 minutes before slicing. Resting allows the juices to redistribute throughout the meat, ensuring that it stays moist and flavorful. If you slice the roast too soon, you risk losing all the flavorful juices, and the meat may turn out dry.
While the roast is resting, you can use the opportunity to make any final adjustments to the gravy or sauce, or you can continue cooking your vegetables in the same braising liquid to absorb all the rich flavors.
5. Braising Liquids and Covering the Roast:
To ensure your roast stays moist and flavorful, cover it while it’s cooking in the oven. You can use aluminum foil or a tight-fitting lid to cover the pot or roasting pan. The steam that builds up during cooking helps to tenderize the meat and infuse the beef with the flavors of the braising liquid (broth, wine, or a combination of both).
For the first half of the cooking time, keep the roast covered to lock in moisture. During the last 30 minutes to an hour, uncover the pot to allow the roast to brown on the outside, creating a beautiful crust. This will help the roast develop a rich, savory exterior while the inside remains tender.
6. Oven Roasting vs. Slow Cooker:
If you’re wondering whether it’s better to cook your pot roast in the oven or a slow cooker, both methods produce tender results, but there are a few differences:
- Oven roasting typically gives the roast a more crispy exterior, which is especially desirable if you prefer some texture on the outside of your roast.
- Slow cooking (in a crockpot or slow cooker) is an even slower method but ensures constant moisture around the roast, which can help infuse the meat with even more flavor. However, it lacks the crispiness that comes from roasting in the oven.
Ultimately, oven roasting provides a balance of tenderness and texture, but a slow cooker is a great option for hands-off cooking.
Bonus Tip:
If you have a larger roast, consider basting it with the braising liquid every hour during the cooking process. This ensures that the roast remains moist and absorbs as much flavor as possible. Just be sure to cover the roast tightly while basting to prevent it from drying out.
Summary:
The key to a perfect oven pot roast is cooking it at a low temperature (325°F) for several hours, depending on the size of the roast. You’ll know it’s done when the internal temperature reaches 190-205°F for the best tenderness. Don’t forget to rest the meat before slicing to ensure juiciness, and be sure to use a covered roasting pan or Dutch oven to maintain moisture.
With these tips in mind, you’re guaranteed a pot roast that’s tender, juicy, and full of flavor.
Pot Roast Tips and Tricks for Moist, Fall-Apart Meat
Why You Should Always Brown the Beef Roast First
Browning the beef roast is an essential step in making a delicious pot roast. It adds depth of flavor, enhances the texture, and improves the overall dish. Let’s break down why this step is so important.
1. The Maillard Reaction: The Secret to Flavor
Browning the roast triggers the Maillard reaction, which happens when heat reacts with amino acids and sugars. This process creates savory flavors and complex aromas that slow cooking can’t achieve.
- What it does: The Maillard reaction forms a golden-brown crust that adds rich, caramelized flavors. This crust becomes a flavor-packed layer that contrasts with the tender interior.
- Why it matters: Without browning, the roast would lack the deep flavors that make it so appetizing.
2. Enhancing the Texture
Browning the meat helps develop a crispy, flavorful crust. This crust seals in moisture, keeping the roast tender and juicy.
- Sealing in juices: The sear locks in the meat’s natural juices. This ensures that the roast stays moist while it cooks.
- Better texture: The contrast between the crispy crust and the tender meat inside creates a pleasing texture with every bite.
3. A More Flavorful Braising Liquid
When you brown the roast, it leaves browned bits (fond) in the pan. These bits are packed with rich flavors that add depth to the dish.
- Deglazing the pan: After browning, pour broth, wine, or water into the pan to lift the fond. This infuses the braising liquid with all the caramelized flavors, making the sauce more flavorful.
- Flavor infusion: As the roast cooks, the braising liquid absorbs these flavors, creating a rich and savory sauce.
4. Visual Appeal and Presentation
Browning the beef doesn’t just improve flavor. It also makes the roast look more appetizing. The golden-brown crust adds a rustic charm to the dish.
- Enhances appearance: A beautifully browned roast looks inviting and impressive when served.
- Aromatic appeal: The aromas that waft from the browned meat make your meal even more enticing.
5. Browning Promotes Even Cooking
By browning the roast, you help ensure that it cooks evenly. The crust formed during searing helps the roast retain heat more effectively, which means more uniform cooking.
- Even cooking: The sear prevents the outer layer from overcooking, while the inside stays tender and juicy.
6. It’s a Simple Step for Big Impact
Browning the roast may add extra time, but it’s a simple step that makes a huge difference in flavor and texture. Here’s how to do it:
- Heat a pan over medium-high heat. Add oil with a high smoke point, like vegetable oil.
- Pat the beef dry to ensure a good sear. Season with salt, pepper, and your choice of spices.
- Sear the roast on all sides until it’s golden brown. This should take about 3-4 minutes per side.
- Once browned, remove the roast from the pan and proceed with your recipe.
7. Browning Enhances the Maillard Flavor Throughout the Cooking Process
The searing process gives the braising liquid a head start in developing flavor. As the roast cooks, the rich flavors from the seared meat deepen.
Bonus Tip:
Even if you’re short on time, don’t skip the browning. It only takes about 10-15 minutes, but the flavor payoff is huge.
Summary:
Browning your beef roast is crucial for creating the best pot roast. It enhances the flavor, texture, and appearance of the dish. The Maillard reaction forms a rich crust, while sealing in moisture and infusing the braising liquid with savory depth. This simple step guarantees a tender, juicy, and flavorful roast every time.
How to Keep Pot Roast Moist in the Oven (Covering, Braising, Resting)
One of the most common challenges when making pot roast is ensuring that the meat stays moist and tender throughout the cooking process. The key to achieving this lies in three main techniques: covering, braising, and resting. Let’s explore how each of these methods helps to keep your pot roast juicy and flavorful.
1. Covering the Pot Roast for Moisture Retention
When cooking your pot roast in the oven, it’s essential to cover the roast properly. This ensures that the moisture generated during cooking is trapped, preventing the meat from drying out.
- Why it works: The roast releases juices as it cooks, and these juices create steam inside the cooking vessel. Covering the pot or Dutch oven helps to trap this steam, which then reabsorbs into the meat. This process helps keep the roast moist and tender by preventing it from becoming too dry or overcooked.
- Best options for covering: Use a tight-fitting lid or cover the pot with aluminum foil. If you’re using a Dutch oven, a lid is ideal because it creates a sealed environment. If you’re roasting the meat in a roasting pan, make sure to cover it tightly with foil to prevent the moisture from escaping.
2. Braising for Tenderness and Flavor
Braising is the cooking method that forms the foundation of a perfect pot roast. It involves cooking the meat in liquid at a low temperature, which is essential for maintaining moisture and ensuring tenderness.
- What is braising? Braising involves cooking the roast in a small amount of liquid (such as beef broth, wine, or a combination) at a low temperature for an extended period. This technique allows the collagen in the meat to break down, resulting in a tender, juicy roast.
- How to braise: After browning the roast, place it in a heavy Dutch oven or oven-safe pot. Add your braising liquid (broth, wine, or a mixture of both), making sure the liquid reaches about halfway up the roast. The liquid helps to keep the meat moist while it slowly cooks in the oven.
- Low and slow cooking: Braising requires cooking at a low temperature—usually around 300°F (150°C)—for several hours. This long, slow cooking time allows the meat to tenderize and absorb the flavors of the liquid, making it extremely juicy and flavorful.
3. Resting the Roast After Cooking
Once your pot roast has finished cooking, it’s important to let it rest before slicing. Resting allows the juices to redistribute throughout the meat, ensuring that every slice remains juicy and flavorful.
- Why resting is crucial: After cooking, the fibers in the meat contract, pushing the juices toward the center. If you cut into the roast immediately, these juices will escape, resulting in a drier roast. Allowing the meat to rest helps reabsorb the juices and ensures that the roast remains moist.
- How long to rest: Let the roast rest for at least 15 to 20 minutes before slicing. During this time, cover it loosely with foil to keep it warm. This resting period is essential for achieving the best texture and moisture in every bite.
4. Braising Liquid: A Bonus for Moisture and Flavor
The braising liquid not only helps keep the roast moist, but it also becomes a flavorful sauce to serve with the meat. The juices from the roast, vegetables, and seasonings combine to form a rich, flavorful liquid that enhances the entire meal.
- Why use the braising liquid? As the roast cooks, the fat and collagen melt into the liquid, creating a rich sauce that complements the meat. You can even thicken the braising liquid by simmering it for a few minutes to create a hearty gravy.
- How to serve: After the roast has rested, slice it against the grain and serve it with a generous amount of the braising liquid poured over the top. The sauce adds extra flavor and helps maintain the moisture of the meat.
5. Temperature Control: Low and Steady is the Key
When roasting your pot roast in the oven, it’s important to maintain a consistent low temperature throughout the cooking process. A sudden increase in heat can cause the meat to dry out, so avoid raising the oven temperature too high.
- Optimal oven temperature: Set your oven to 300°F (150°C), and keep it there for several hours. The low temperature allows the roast to cook slowly, breaking down tough fibers without losing moisture.
- Using a meat thermometer: To make sure the roast is cooked to your desired level of doneness, use a meat thermometer. For a medium-rare roast, aim for an internal temperature of 130°F (54°C), and for a well-done roast, target around 160°F (71°C). The thermometer helps to ensure the meat is cooked perfectly without drying out.
Bonus Tip:
If you’re cooking your pot roast in a slow cooker or crockpot, you can follow the same principles of covering, braising, and resting. The slow cooker keeps the meat at a steady low temperature and locks in moisture, making it another excellent method for keeping your pot roast moist and tender.
Summary:
To keep your pot roast moist in the oven, it’s essential to cover it while cooking, braise it in flavorful liquid, and let it rest after cooking. These three techniques work together to maintain moisture, enhance tenderness, and produce a juicy, flavorful roast. Be sure to control the temperature and use the braising liquid to elevate both the flavor and texture of the meat. With these tips, you’ll be able to prepare a moist and delicious pot roast every time.
Using a Meat Thermometer to Know When Pot Roast Is Done
Knowing the perfect moment to take your pot roast out of the oven can be tricky. Overcooking can lead to a dry, tough roast, while undercooking may leave the meat tough and chewy. A meat thermometer is your best tool to ensure your pot roast reaches the ideal doneness every time. Let’s dive into how to use it effectively and why it’s so important.
1. The Importance of Accurate Temperature
A meat thermometer allows you to accurately measure the internal temperature of your pot roast without guessing. Relying on cooking time alone isn’t enough because every roast is different in terms of thickness, size, and fat content. The thermometer ensures that your roast is neither undercooked nor overcooked, giving you a consistent, perfect result.
- Why it matters: Pot roast is typically a tough cut of meat, like chuck or brisket, which requires slow cooking to break down collagen and achieve tenderness. A thermometer helps you determine when the roast has reached the proper temperature to ensure it’s tender and juicy without overcooking.
- What can go wrong without it: Without a thermometer, you risk cooking the roast too long or not enough, leading to dry, tough meat. A thermometer takes the guesswork out of the equation.
2. Ideal Temperatures for Pot Roast
Pot roast is a braised dish, which means it’s typically cooked at a low temperature over a long period. Different temperatures correspond to different levels of doneness, so understanding the ideal internal temperature is crucial.
- For tender, fall-apart pot roast: Aim for an internal temperature of around 190°F (88°C) to 205°F (96°C). At this range, the collagen in the meat breaks down completely, and the roast becomes tender and juicy. It should be soft enough to shred with a fork.
- For a more traditional, sliceable roast: If you prefer your pot roast to be sliceable rather than shreddable, aim for a temperature of about 160°F (71°C) to 170°F (77°C). This range allows the meat to remain tender but still hold together in slices.
- For medium-rare pot roast (less common for this dish): If you’re looking for a more traditional roast beef result, target 130°F (54°C) to 135°F (57°C). This temperature results in a slightly pink, medium-rare roast, but keep in mind that pot roast is typically cooked slowly for a tender, melt-in-your-mouth texture, so this isn’t usually the desired doneness for pot roast.
3. How to Use the Meat Thermometer Effectively
Knowing when to insert the thermometer and how to take an accurate reading is key to getting it right.
- Insert the thermometer in the thickest part of the roast: Avoid touching bone or fat. These areas won’t give you an accurate reading. The thickest part of the roast will be the most challenging to cook, so it’s the best place to measure temperature.
- Check the temperature toward the end of cooking: Insert the thermometer about 2 hours before you expect your pot roast to be done. This gives you time to monitor the roast as it approaches your target temperature. Keep checking every 30 minutes after that to ensure it doesn’t overcook.
- Leave the thermometer in during cooking (if using a probe thermometer): If you’re using a probe thermometer, you can leave it in the meat while it cooks, and it will alert you once the target temperature is reached. This removes the need to open the oven and check repeatedly, which helps maintain a consistent cooking temperature.
4. The Resting Period After Cooking
After your pot roast reaches the desired internal temperature, it’s important to let it rest before slicing. As the roast rests, the juices redistribute throughout the meat, ensuring that it remains moist and flavorful when cut.
- How long to rest: Let the roast rest for 15 to 20 minutes after taking it out of the oven. Tent the roast with aluminum foil to keep it warm while it rests.
- Why resting helps: During cooking, the meat’s fibers contract, pushing juices toward the center. Resting allows the juices to redistribute throughout the meat, preventing them from escaping when you slice it. This ensures that each slice is moist and tender.
5. Types of Meat Thermometers
There are a few different types of meat thermometers, each with their advantages. Here’s a breakdown:
- Instant-read thermometer: This type of thermometer gives you a quick reading within 5-10 seconds. It’s great for checking the temperature toward the end of the cooking time, but you’ll need to open the oven and take the roast out to insert it.
- Probe thermometer (oven-safe): A probe thermometer allows you to monitor the temperature without opening the oven. Insert the probe at the beginning of cooking, and it will track the internal temperature of the roast as it cooks. You can set an alarm to go off when it reaches your target temperature, making this option very convenient.
- Digital vs. dial thermometer: Digital thermometers provide a more precise reading and tend to be easier to read, especially in low-light conditions. Dial thermometers are more traditional, but they are slower and may not be as accurate as digital options.
6. Other Tips for Checking Doneness
- Use multiple thermometer readings: If your roast is particularly large or thick, you may want to check the temperature at different spots to ensure even cooking.
- Don’t rely on color alone: While some people use color (such as pinkness) to determine doneness, this can be misleading. A meat thermometer is far more reliable than relying on visual cues.
- Check after resting: If you’re still unsure whether your roast is done after resting, check the temperature again. It may rise by a few degrees during resting, which could affect your final judgment.
Bonus Tip:
Some high-end meat thermometers come with wireless capabilities. These can send temperature readings directly to your phone, making it even easier to monitor the cooking process without even opening the oven.
Summary:
Using a meat thermometer is an essential step in ensuring your pot roast reaches the perfect level of doneness. By aiming for the correct internal temperature, you’ll achieve a tender, juicy roast every time. Whether you prefer a fall-apart roast or a more traditional sliceable one, a meat thermometer helps you avoid overcooking and ensures consistent results. After cooking, don’t forget to rest the roast to lock in the moisture and flavor.
How to Thicken Pot Roast Gravy Using Cornstarch or Reduction
After cooking a pot roast, the deliciously rich braising liquid left in the pot can be turned into a flavorful gravy to complement the roast. However, sometimes this gravy needs a little thickening to achieve the perfect consistency. Fortunately, there are two main ways to thicken pot roast gravy: cornstarch and reduction. Let’s explore each method and how to use them effectively.
1. Thickening Pot Roast Gravy with Cornstarch
Cornstarch is one of the quickest and easiest ways to thicken your pot roast gravy, creating a smooth and glossy sauce in no time. Here’s how to use it:
Why Cornstarch Works
Cornstarch is a powerful thickening agent because it absorbs liquid and expands when heated. When mixed with liquid, it forms a gel-like consistency, which thickens the sauce quickly without altering its flavor.
Steps to Use Cornstarch:
- Make a Slurry: Combine 1 tablespoon of cornstarch with 1 tablespoon of cold water (or beef broth if you want to enhance the flavor). Stir until the mixture forms a smooth, lump-free paste.
- Add to the Gravy: Once your braising liquid has been strained and you’ve removed the roast from the pot, bring the liquid to a gentle simmer over medium heat. Gradually whisk the slurry into the simmering liquid.
- Simmer Until Thickened: Stir constantly and let the gravy simmer for a few minutes. As it heats, the gravy will begin to thicken. Once it reaches the desired consistency, taste it and adjust the seasoning if necessary.
Tips for Using Cornstarch:
- If the gravy isn’t thickening to your liking, you can add a little more cornstarch slurry (but be careful not to overdo it).
- For a glossy finish, cornstarch is your best option because it gives the gravy a smooth, shiny texture.
- If your gravy becomes too thick, you can easily thin it by adding a bit more broth or water.
2. Thickening Pot Roast Gravy by Reduction
If you prefer a richer, more concentrated flavor for your gravy, reduction is an excellent method. Reduction involves cooking the gravy down over low heat to evaporate some of the liquid, thus concentrating the flavors and thickening the sauce naturally.
Why Reduction Works
As the gravy simmers and liquid evaporates, the remaining ingredients become more concentrated. This process naturally thickens the sauce without any need for added starches, while also enhancing the flavor.
Steps for Reduction:
- Strain the Gravy: After removing the roast, strain the braising liquid to remove any large pieces of vegetables or meat.
- Simmer the Liquid: Pour the strained liquid back into the pot and bring it to a simmer over medium-low heat. Allow it to cook uncovered. The goal is to let the liquid slowly evaporate, which will intensify both the thickness and the flavors.
- Stir Occasionally: Stir the liquid every few minutes to ensure it doesn’t burn or stick to the bottom of the pot.
- Check the Consistency: As the liquid reduces, it will naturally thicken. Once it reaches the desired consistency (usually after 15–30 minutes of simmering), remove it from the heat.
Tips for Using Reduction:
- If you’re looking for a thicker sauce but don’t want to use cornstarch, reduction is a great option because it builds the flavor of the gravy while thickening it.
- Be patient, as this method takes longer than using cornstarch. However, the payoff is a deeper, richer flavor.
- If you want to speed up the process, you can increase the heat slightly, but be careful not to boil the liquid too rapidly, which may cause the gravy to burn or become too salty.
3. Combining Both Methods for Optimal Thickness and Flavor
For the best of both worlds, you can combine cornstarch and reduction to create a rich, flavorful, and perfectly thickened gravy.
How to Combine:
Start by reducing the braising liquid to concentrate the flavor. Once it has reduced by about one-third, use cornstarch slurry to thicken it to your desired consistency. This combination creates a deep, savory gravy with a velvety smooth texture.
Why Combine the Methods:
The reduction process enhances the gravy’s flavor, while the cornstarch gives it that perfect, glossy finish. Together, they create the ultimate pot roast gravy.
4. Flavoring Your Gravy During the Thickening Process
While thickening the gravy, this is a perfect opportunity to adjust the flavor profile of your sauce.
Seasoning:
Taste the gravy as it thickens and add additional seasonings like salt, pepper, garlic powder, or even a dash of Worcestershire sauce for extra depth.
Optional Additions:
Consider incorporating a small amount of fresh herbs like rosemary or thyme, or a splash of red wine for added richness. A little splash of balsamic vinegar can also enhance the flavor and balance the richness of the gravy.
5. Final Tips for Perfect Pot Roast Gravy
Serving Suggestions: Serve your thickened pot roast gravy over the meat, mashed potatoes, or any vegetables you’ve prepared. It’s the perfect finishing touch to a comforting, hearty meal.
Consistency: The gravy should be thick enough to coat the back of a spoon, but not so thick that it becomes gloopy. Aim for a smooth, velvety texture that flows easily but sticks to the meat.
Storing Leftovers: If you have leftover gravy, store it in an airtight container in the fridge. It can thicken further as it cools, so when reheating, you may need to thin it with a bit of broth or water.
Pot Roast Variations and Best Side Dishes to Serve With It
Slow Cooker and Instant Pot Pot Roast Recipe Variations
While the classic oven-roasted pot roast recipe is a time-honored favorite, there are also convenient and time-saving ways to make pot roast using modern kitchen appliances. Both the slow cooker and the Instant Pot can create a delicious, tender pot roast, but they each have unique benefits and techniques. Let’s explore how these alternatives stack up and how you can adapt your pot roast recipe for each one.
1. Slow Cooker Pot Roast: Set It and Forget It
The slow cooker is ideal for creating a pot roast that’s low-effort, high-reward. Cooking your pot roast in a slow cooker allows the meat to become melt-in-your-mouth tender as it cooks slowly over hours. Here’s how to adapt the recipe for the slow cooker:
Why Choose the Slow Cooker?
- Set and forget: The slow cooker requires minimal preparation. Once you have everything in the pot, you can set it and let it cook while you go about your day. It’s a great option for busy schedules or preparing a meal ahead of time.
- Tender and juicy results: The long cooking time allows the connective tissues in the meat to break down, resulting in an incredibly tender roast. The vegetables absorb the flavors from the meat and braising liquid, becoming soft and flavorful.
How to Make Pot Roast in a Slow Cooker:
- Sear the Meat First (Optional): Just like the oven version, browning the roast in a pan before placing it in the slow cooker helps develop richer flavors. Sear the beef on all sides to create a caramelized crust, then transfer it to the slow cooker.
- Layer Ingredients: Add the root vegetables (carrots, potatoes, celery, and onion) at the bottom of the slow cooker. This helps to keep the vegetables from becoming too mushy. Pour the broth, wine, or water over the meat and vegetables, and add seasonings like garlic, herbs, and Worcestershire sauce.
- Set the Temperature: Cook on low for 8–10 hours or on high for 4–6 hours. The low setting is generally preferred, as it allows the meat to cook slowly and become more tender.
- Finish and Serve: Once the roast is done, remove the meat from the slow cooker and allow it to rest before slicing. If desired, you can use the slow cooker juices to make gravy, either by thickening it with cornstarch or reducing it on the stove.
Slow Cooker Tips:
- Don’t overfill: Make sure the roast and vegetables fit comfortably in the slow cooker. Overcrowding can affect the cooking time and the texture of the roast.
- Use less liquid: Slow cookers retain moisture, so you generally need less liquid than in traditional oven roasting. A cup or two of broth or wine is usually enough.
- Don’t peek too often: It’s tempting, but opening the slow cooker lid too often will release heat and prolong cooking time.
2. Instant Pot Pot Roast: Quick and Flavorful
The Instant Pot (or any electric pressure cooker) is a great tool for those who want a fast, tender pot roast without sacrificing flavor. With its pressure-cooking function, the Instant Pot can cook a pot roast in a fraction of the time it takes in the slow cooker or oven. Here’s how to prepare a pot roast using the Instant Pot:
Why Choose the Instant Pot?
- Speed: The Instant Pot dramatically reduces cooking time. A pot roast that would take 3–4 hours in the oven or slow cooker can be ready in just 1 to 1.5 hours.
- Retained moisture: The pressure cooking function ensures that the meat stays moist and tender, while also concentrating the flavors of the braising liquid.
How to Make Pot Roast in an Instant Pot:
- Sear the Meat: Just like in the slow cooker version, start by searing the roast in the Instant Pot using the Sauté function. Searing the meat helps to develop a deep, caramelized flavor, so don’t skip this step.
- Add the Vegetables and Broth: After searing, layer the vegetables (carrots, potatoes, onions, celery) and pour in the braising liquid (such as beef broth, wine, or a combination). Add seasonings like garlic, thyme, rosemary, and Worcestershire sauce for enhanced flavor.
- Set the Instant Pot: Secure the lid and set the Instant Pot to Manual or Pressure Cook on High Pressure for about 60–80 minutes, depending on the size of the roast. A smaller roast will need closer to 60 minutes, while a larger one may require up to 90 minutes.
- Natural Release: After cooking, let the Instant Pot release pressure naturally for 10-15 minutes before manually releasing the remaining pressure. This ensures the meat stays tender and juicy.
- Rest and Serve: As with the other methods, allow the roast to rest before slicing. Use the remaining liquid to make gravy by thickening it on the stove or with cornstarch.
Instant Pot Tips:
- Add enough liquid: The Instant Pot relies on steam to cook, so ensure there is at least 1.5 cups of liquid in the pot. This can be broth, wine, or water.
- Don’t overcook: While the Instant Pot is efficient, overcooking can cause the roast to become too soft. Always check for doneness using a meat thermometer to avoid overcooking.
- Use the Natural Release method: Letting the pot naturally release pressure helps keep the meat tender, as the slow reduction in pressure allows the juices to redistribute into the roast.
3. Flavor Variations for Slow Cooker and Instant Pot Pot Roast
Both the slow cooker and Instant Pot offer opportunities to get creative with your pot roast recipe by incorporating unique flavor variations. Here are a few ideas:
Add Red Wine or Beer:
For a deeper, more complex flavor, try adding a splash of red wine or beer to your braising liquid. These will enhance the richness of the gravy and add layers of flavor to the meat.
Experiment with Herbs and Spices:
Feel free to play with different herbs and spices to give your pot roast a unique twist. Try adding bay leaves, oregano, or paprika for an extra depth of flavor.
Mushrooms for Umami:
Mushrooms are a classic addition to pot roast. If you want to add umami and earthiness, toss in a handful of sautéed mushrooms when you add the liquid, or let them cook along with the roast in the slow cooker or Instant Pot.
Smoky Flavor with Liquid Smoke:
If you’re craving a bit of smoky flavor, consider adding a few drops of liquid smoke to the cooking liquid. This can give your pot roast a barbecue-inspired twist.
Conclusion:
The slow cooker and Instant Pot offer two fantastic alternatives for making a pot roast, each with its own benefits. The slow cooker allows for a more hands-off approach, delivering a deeply flavorful, tender roast with minimal effort. The Instant Pot, on the other hand, is perfect for those who want a delicious roast in less time, while still enjoying the tenderness and richness of a classic pot roast. With a few adjustments, you can easily customize your pot roast recipe to suit your preferences and time constraints, ensuring a satisfying meal every time.
Best Side Dishes for Pot Roast: Mashed Potatoes, Rolls, Roasted Veggies
When it comes to a hearty, comforting dish like pot roast, the right side dishes can elevate the meal to a whole new level. Pot roast is rich, savory, and full of deep flavors, so pairing it with the right sides balances the meal perfectly, adding texture, freshness, and flavor. Here are some classic and complementary sides that work wonderfully with pot roast:
1. Creamy Mashed Potatoes: The Ultimate Comfort Food
You can’t go wrong with mashed potatoes when serving pot roast. The creamy, buttery texture of mashed potatoes contrasts beautifully with the tender, flavorful roast, making it a classic pairing. The rich mashed potatoes soak up the savory juices from the roast and gravy, creating the ultimate comfort food experience.
Why They’re Perfect for Pot Roast:
- Absorb the Gravy: Mashed potatoes are ideal for mopping up the rich, flavorful gravy from the pot roast. Each bite becomes a perfect combination of beef and potatoes.
- Versatile Flavors: You can make mashed potatoes as simple or as gourmet as you like. For a classic version, all you need are butter, cream, salt, and pepper. For a twist, add roasted garlic, sour cream, or fresh herbs like chives or rosemary for extra flavor.
- Smooth or Chunky: Mashed potatoes can be made to suit your texture preference. Some enjoy a perfectly smooth mash, while others prefer a more rustic version with chunks of potato for added bite.
How to Make Them:
- Boil the Potatoes: Choose waxy potatoes like Yukon Golds or red potatoes for a creamy mash. Boil them until tender.
- Mash and Season: Mash the potatoes with butter, heavy cream (or milk), and season with salt and pepper. For extra flavor, mix in roasted garlic or Parmesan cheese.
- Serve: Spoon the mashed potatoes onto each plate and ladle pot roast gravy over the top. Garnish with fresh herbs or a sprinkle of cheese for a finishing touch.
2. Soft, Buttery Dinner Rolls: The Perfect Bread Companion
Dinner rolls are another timeless side that pairs beautifully with pot roast. These soft, fluffy rolls are perfect for sopping up gravy and juices, making them an indispensable addition to the meal. Their neutral flavor complements the richness of the pot roast, adding a comforting element to the plate.
Why They’re Perfect for Pot Roast:
- Great for Gravy: There’s nothing better than breaking off a piece of a warm roll and dipping it into the flavorful gravy or drippings from the pot roast.
- Soft and Pillowy: The delicate texture of a freshly baked roll adds variety to the otherwise hearty meal, giving your guests something light and soft to enjoy alongside the rich beef.
- Customizable Flavors: You can serve traditional butter rolls, or elevate them with additions like garlic butter, fresh herbs, or even cheese baked right into the dough for a twist.
How to Make Them:
- Prepare the Dough: Mix together flour, yeast, sugar, and salt to form a soft dough. Let it rise until doubled in size.
- Shape the Rolls: After the dough has risen, divide it into small portions and shape them into round rolls.
- Bake: Place the rolls on a baking sheet, let them rise again, then bake in the oven until golden brown. Brush with melted butter when they come out of the oven for that irresistible shine and extra flavor.
3. Roasted Vegetables: A Flavorful and Nutritious Side
Roasted vegetables are the perfect accompaniment to pot roast, providing a balance of flavors and textures. Roasting brings out the natural sweetness of vegetables and adds a caramelized, slightly crispy edge that pairs wonderfully with the tender pot roast. Classic vegetables like carrots, parsnips, onions, and Brussels sprouts are fantastic choices, but feel free to mix in others, such as sweet potatoes or butternut squash, for added color and variety.
Why They’re Perfect for Pot Roast:
- Complement the Meat’s Richness: The earthy, roasted flavor of vegetables creates a perfect contrast to the savory, beefy taste of the pot roast.
- Nutritious and Colorful: Vegetables add nutrients and vibrant color to your plate, making the meal more balanced and visually appealing.
- Variety in Textures: The crispy outer layers of roasted vegetables, paired with their tender insides, offer a variety of textures that complement the soft, melt-in-your-mouth texture of the pot roast.
How to Make Them:
- Choose Your Vegetables: Carrots, potatoes, onions, and parsnips are staples, but you can also experiment with Brussels sprouts, cauliflower, or even mushrooms.
- Season and Roast: Toss the vegetables with olive oil, salt, pepper, and herbs (like thyme, rosemary, or sage). Roast them in a preheated oven at 400°F (200°C) for 30–40 minutes or until they are golden and tender, stirring halfway through.
- Serve Alongside the Roast: Place the roasted vegetables on the same plate or serve them separately as a colorful side dish that perfectly balances the richness of the pot roast.
4. Optional Sides: Fresh Green Salad or Creamy Polenta
While mashed potatoes, rolls, and roasted vegetables are the usual go-tos, you can mix things up with some additional sides to further enhance your meal:
- Green Salad: A fresh garden salad with crisp greens, cucumber, and a tangy vinaigrette provides a refreshing contrast to the heavy, hearty pot roast. The acidity from the dressing can also help cut through the richness of the meat and gravy.
- Creamy Polenta: If you want something a little different, creamy polenta is another excellent side that pairs well with pot roast. Its smooth texture and mild flavor act as a great base to absorb the flavors of the meat and gravy.
Conclusion:
When it comes to pairing side dishes with pot roast, you have plenty of options that will complement the rich, savory flavors of the beef. Mashed potatoes, buttery dinner rolls, and roasted vegetables are classic choices that work beautifully with the tender, juicy meat, offering a variety of textures and flavors that balance the meal perfectly. And for a bit of variety, you can add sides like green salads or creamy polenta to keep things fresh and exciting. These sides are sure to elevate your pot roast dinner and create a meal that’s both satisfying and unforgettable.
What to Do with Leftover Pot Roast (Tacos, Sandwiches, and More)
Leftover pot roast can be a lifesaver on busy days, turning into a whole new meal with minimal effort. The tender, flavorful beef from your pot roast can be repurposed into a variety of delicious dishes, offering a perfect way to enjoy the meal again without feeling like you’re eating the same thing twice. Here are some creative and tasty ideas for transforming your leftover pot roast:
1. Pot Roast Tacos: A Flavorful Twist on Classic Tacos
One of the best ways to reinvent leftover pot roast is by turning it into tacos. Shredding the roast gives it a new texture and makes it easy to load up into soft tortillas, where you can add a variety of toppings for a burst of flavor. Whether you’re a fan of spicy or fresh ingredients, pot roast tacos are a crowd-pleasing meal that’s easy to prepare.
How to Make Pot Roast Tacos:
- Shred the Beef: Take your leftover pot roast and shred it using two forks, breaking the meat into bite-sized pieces.
- Warm the Tortillas: Heat up soft flour or corn tortillas on a griddle or in the microwave. For extra flavor, lightly toast them over an open flame or on a skillet.
- Add Toppings: Load the shredded beef into the tortillas, and top with your favorite taco fixings such as fresh cilantro, diced onions, salsa, guacamole, sour cream, and a squeeze of lime. For a spicy kick, you can add jalapeños or hot sauce.
- Serve with a Side: Pair with a side of Mexican rice, beans, or a crisp salad to complete the meal.
Why It’s Perfect for Leftovers:
Pot roast tacos are incredibly versatile, and you can customize them with whatever ingredients you have on hand. This dish allows you to get creative with flavors, making it a fun and easy way to enjoy your leftover roast in a completely different form.
2. Pot Roast Sandwiches: Hearty and Satisfying
Leftover pot roast also makes for an incredible sandwich filling. Whether you prefer a classic beef sandwich or want to make something a little more gourmet, there are countless ways to use shredded pot roast for a delicious sandwich experience.
How to Make Pot Roast Sandwiches:
- Shred the Pot Roast: Similar to the tacos, shred the leftover pot roast using two forks.
- Choose Your Bread: Use hearty bread like a baguette, ciabatta roll, or a toasted brioche bun. You can also go for something simpler, like a classic sandwich loaf, depending on your preference.
- Add Cheese and Condiments: Melted cheese like Swiss, cheddar, or provolone pairs beautifully with the savory beef. Add some creamy horseradish sauce, mustard, or mayonnaise for a little extra flavor.
- Include Vegetables: A handful of fresh greens like arugula or spinach can provide a nice peppery contrast to the richness of the pot roast. Pickles or caramelized onions also work well as a tangy or sweet contrast.
Why It’s Perfect for Leftovers:
Pot roast sandwiches are an easy way to transform your leftovers into a meal that’s just as satisfying as the original roast. The combination of tender beef, rich cheese, and flavorful condiments will make each bite enjoyable, and the sandwich is portable, making it perfect for lunch or a casual dinner.
3. Pot Roast Beef Stew: A Hearty Soup for Any Day
If you’re craving something warm and comforting, pot roast beef stew is a perfect option. By incorporating the leftover pot roast into a stew, you can make a filling meal with minimal work. The already-cooked beef lends a rich, deep flavor to the broth, creating a delicious and satisfying dish in no time.
How to Make Pot Roast Beef Stew:
- Dice the Leftover Beef: Cut the leftover pot roast into cubes or large chunks.
- Add Vegetables and Broth: In a large pot, sauté onions, carrots, and celery until softened. Add in your diced beef, along with beef broth, diced tomatoes, and any leftover vegetables from the pot roast (like potatoes or parsnips).
- Season: Add garlic, bay leaves, thyme, salt, and pepper. Bring the stew to a simmer and cook for about 30 minutes, allowing the flavors to meld together.
- Serve: Serve the stew hot, garnished with fresh parsley or a drizzle of olive oil for extra richness. You can pair the stew with crusty bread for dipping.
Why It’s Perfect for Leftovers:
This stew is a hearty, one-pot meal that uses the beef in a completely new form. It’s also very forgiving — feel free to add in any vegetables you have on hand or use different seasonings for a personalized flavor profile.
4. Pot Roast Chili: Spicy, Hearty, and Flavorful
For a bold, flavorful twist, transform your leftover pot roast into chili. This dish adds a rich and spicy element to your leftovers, perfect for cooler weather or when you’re craving something hearty.
How to Make Pot Roast Chili:
- Shred the Beef: Shred the leftover pot roast into small pieces, making it easier to incorporate into the chili.
- Cook the Base: In a large pot, sauté onions, garlic, and bell peppers in olive oil. Add diced tomatoes, kidney beans, black beans, and any leftover vegetables like carrots or corn.
- Season the Chili: Add chili powder, cumin, smoked paprika, salt, and pepper. Stir in the shredded pot roast and let the chili simmer for about 30–45 minutes, allowing the flavors to meld.
- Serve with Toppings: Ladle the chili into bowls and top with shredded cheese, sour cream, cilantro, and a squeeze of lime for extra freshness.
Why It’s Perfect for Leftovers:
Chili is an excellent way to add new layers of flavor to your leftover pot roast. The spices and beans enhance the beef, making for a rich, satisfying meal. Plus, chili is incredibly versatile, so you can customize the heat level and ingredients to suit your taste.
5. Pot Roast Shepherd’s Pie: A Cozy, Comforting Casserole
If you want to create a full meal with your leftovers, a shepherd’s pie using pot roast is a wonderful option. This hearty dish combines the beef with vegetables, topped with creamy mashed potatoes, for a comforting and filling casserole that’s perfect for the whole family.
How to Make Pot Roast Shepherd’s Pie:
- Prepare the Beef: Shred your leftover pot roast and mix it with any leftover vegetables from the roast.
- Make the Gravy: In a pan, combine the beef with a bit of broth and seasonings to make a thick, flavorful gravy.
- Assemble the Pie: Layer the beef and vegetable mixture in a casserole dish, then top it with a thick layer of mashed potatoes.
- Bake: Place the casserole in the oven and bake at 375°F (190°C) for about 20 minutes, until the potatoes are golden brown and crispy on top.
Why It’s Perfect for Leftovers:
Shepherd’s pie is a great way to make a comforting, all-in-one meal with your leftover pot roast. The combination of savory beef, vegetables, and mashed potatoes will satisfy your cravings for both comfort food and a hearty dinner.
Conclusion:
Leftover pot roast doesn’t have to be boring. Whether you turn it into tacos, sandwiches, stews, or even a shepherd’s pie, there are endless ways to reinvent your roast into something exciting and delicious. These creative ideas ensure that you’ll never have to waste leftovers, and each dish offers a fresh twist on your original pot roast, giving you new flavors to enjoy.
How to Store and Reheat Pot Roast Without Drying It Out
Pot roast often tastes even better the next day—if you handle the leftovers properly. Follow these steps to lock in moisture and flavor, whether you’re refrigerating, freezing, or reheating.
1. Storing Leftover Pot Roast
- Cool Safely
Let your roast sit at room temperature for no more than two hours before chilling. This prevents bacterial growth while avoiding soggy meat. - Seal Airtight
Transfer beef, veggies, and gravy into separate, tightly sealed containers. That way, each component keeps its own flavor—and nothing picks up unwanted fridge odors. - Boost Moisture
Pour a splash of broth or reserved gravy over the shredded beef before sealing. A little liquid barrier helps the meat stay juicy during storage. - Use Within Days
Plan to eat refrigerated leftovers within 3–4 days. Beyond that, quality—and safety—begin to decline.
2. Freezing for Longer Keeps
- Shred or Slice First
Cutting the roast into manageable pieces ensures even thawing and quicker reheating later on. - Pack for Protection
Choose freezer‑safe bags or rigid containers, squeezing out as much air as possible. This minimizes freezer burn. - Include a Liquid Layer
A small amount of broth or gravy in the bag keeps the meat tender, even after weeks in the freezer (up to 3 months). - Label and Track
Mark each package with the date you froze it. That helps you rotate through meals and avoid mystery dinners.
3. Reheating Methods That Preserve Juiciness
- Stovetop Revival
Warm chunks of roast over low heat in a skillet. Cover the pan and add a splash of broth or gravy to create steam. Stir now and then until everything is heated through. - Oven Gentle‑Heat
Preheat to 300 °F (150 °C). Arrange the meat in an oven‑safe dish, drizzle with warm broth, then tent with foil. Heat for 20–30 minutes, checking that internal temperature reaches about 140 °F before serving. - Slow Cooker Simmer‑Through
Place roast, veggies, and gravy in the crock on Low. A light layer of liquid and a covered lid will rehydrate the meat over 1–2 hours without overcooking. - Microwave Shortcut
For small portions, use a microwave‑safe dish with a loose cover. Heat on Medium in 1–2 minute bursts, stirring between intervals and adding broth if things look dry.
4. Pro Tips to Keep It Tender
- Always Add Liquid
No matter the reheating method, a little extra gravy or broth prevents drying and enhances the original flavors. - Avoid High Heat
Rapid reheating can toughen the meat fibers. Stick to gentle, low‑temperature approaches. - Reheat Together
Warming roast alongside its vegetables and sauce creates a balanced, cohesive dish—no one ingredient ends up overdone or parched.
Conclusion
This pot roast recipe guarantees tender, juicy meat and perfectly cooked vegetables every time. By selecting the right cut of beef, using the perfect blend of seasonings, and mastering the techniques of searing, braising, and slow cooking, you can easily create a comforting, flavorful meal that will impress every time.
Now that you know all the secrets to making a foolproof pot roast, we’d love to hear about your cooking experiences! Did you try any special tweaks to your pot roast? Share your results or any additional tips you’ve found in the comments below!
If you’re ready to take your cooking to the next level, why not try making the perfect Beef Wellington? Follow this step-by-step guide to create a show-stopping dish that’s sure to impress!