
Introduction
Tiramisu is a beloved Italian dessert, but if you’re looking for a safer, egg-free alternative, this egg-free tiramisu recipe is perfect for you. Whether you avoid raw eggs for safety, dietary, or personal reasons, this easy homemade version ensures you still get to enjoy all the creamy, rich flavors of the classic dessert. In this post, we’ll walk you through how to make this delicious egg-free tiramisu and share some tips to perfect it every time.
Why Choose an Eggless Tiramisu Recipe?
If you’re looking for a delicious egg-free tiramisu recipe, here’s a fantastic method that guarantees a rich flavor and a perfectly creamy texture.
Traditional vs. No-Egg Tiramisu – What’s the Difference?
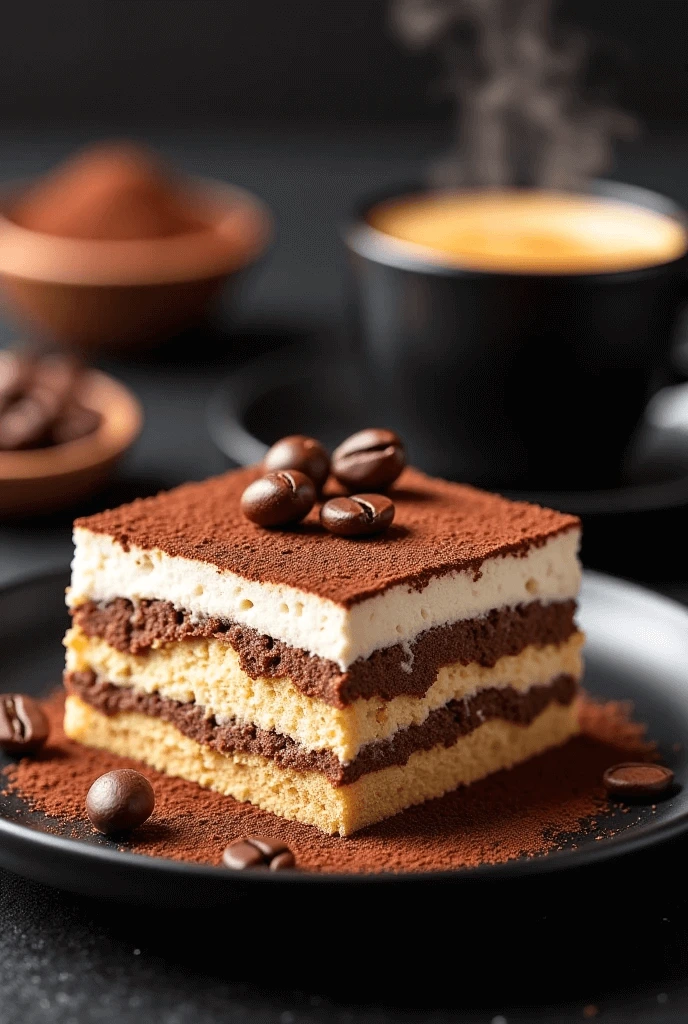
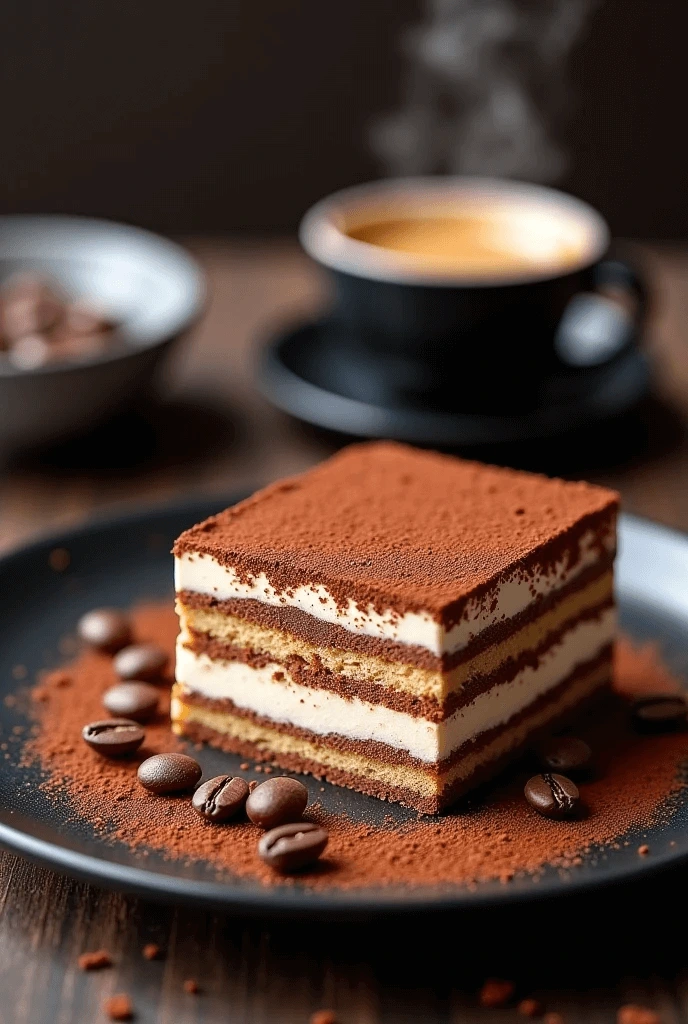
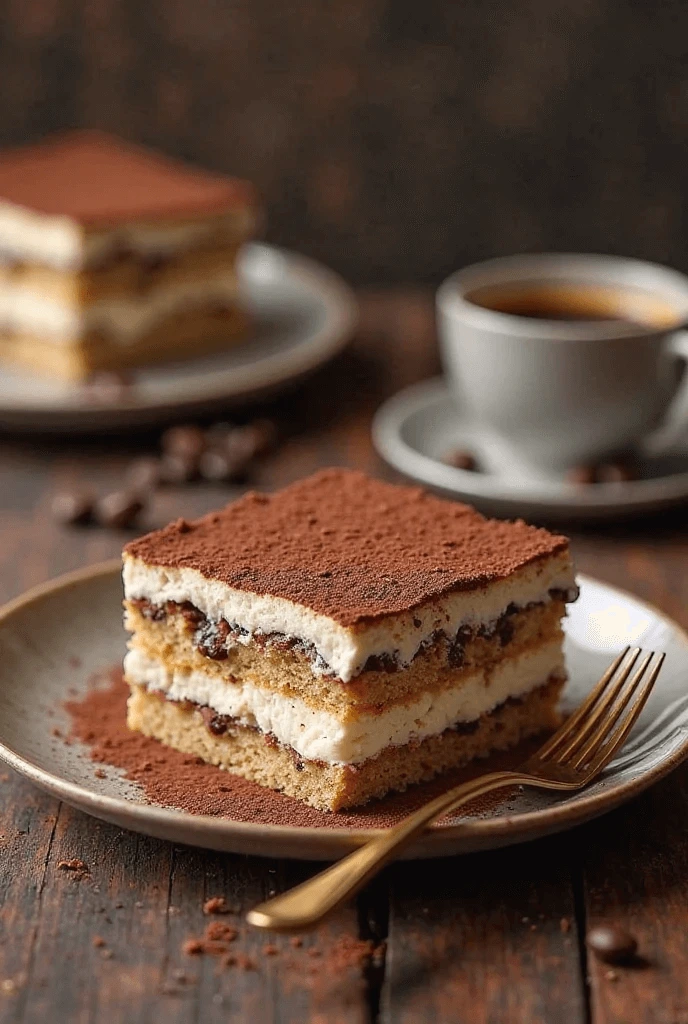
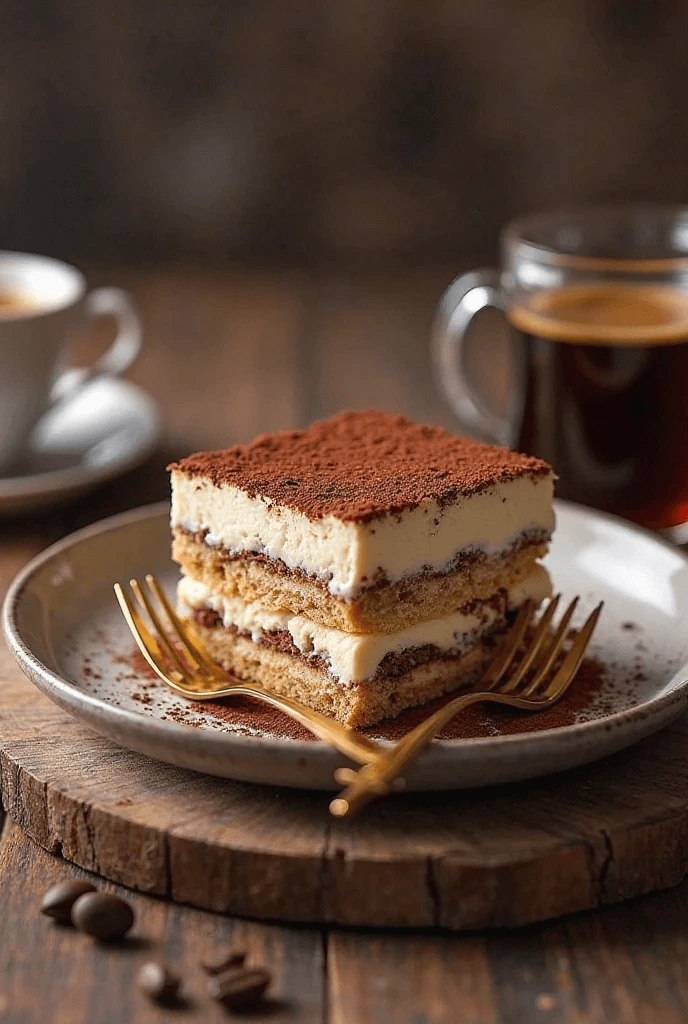
Tiramisu is an iconic dessert with a rich history in Italian cuisine. Known for its decadent layers of espresso-soaked ladyfingers, a creamy mascarpone filling, and a finishing dusting of cocoa powder, tiramisu has delighted dessert lovers for generations. While both traditional and no-egg tiramisu share these key ingredients, the main distinction lies in the use of raw eggs and the impact they have on texture, flavor, and safety.
Traditional Tiramisu – The Role of Raw Eggs
In the classic traditional tiramisu recipe, raw eggs are an essential component. The eggs are typically separated, with the yolks being mixed with sugar until thick and pale. This yolk mixture is then combined with mascarpone cheese to form the rich, creamy filling. The egg whites are beaten separately until stiff peaks form and are carefully folded into the mascarpone mixture, giving the dessert a light, airy texture.
The raw eggs in traditional tiramisu contribute to the dessert’s smooth, velvety consistency and rich flavor. They provide structure to the cream, helping it hold its shape and making the tiramisu easier to slice. Additionally, eggs add a subtle richness and depth to the flavor profile. For many, the presence of eggs is what makes the traditional tiramisu so indulgent and satisfying.
However, there are notable drawbacks to using raw eggs. Food safety is a primary concern, especially in recipes that do not cook the eggs. Salmonella and other bacterial risks can be an issue when consuming raw eggs, particularly for pregnant women, young children, elderly people, and those with compromised immune systems. For this reason, some people avoid traditional tiramisu altogether.
No-Egg Tiramisu – A Safer and Easier Option
For those concerned with food safety, or for anyone who prefers a simpler preparation process, no-egg tiramisu offers an excellent alternative. This version completely omits raw eggs and replaces them with safer ingredients such as heavy cream, whipped mascarpone, or custard-like mixtures.
The eggless tiramisu still delivers a rich and creamy texture, though it tends to be a bit lighter and fluffier compared to the traditional version. Heavy cream is often used to create a whipped filling that mimics the creaminess of the mascarpone mixture, without the need for raw eggs. Some recipes also add a touch of cream cheese or vanilla extract to provide extra flavor and creaminess, helping to maintain a rich mouthfeel.
One of the key benefits of the no-egg version is the simplicity of preparation. There’s no need to worry about whipping egg whites or yolks, which can be tricky to get just right. Without the eggs, this version is also much safer for anyone who may have concerns about consuming raw eggs.
Texture and Flavor Comparisons
The texture of traditional tiramisu is usually denser and richer due to the egg-based filling. The raw eggs give the dessert a firm, smooth consistency that’s perfect for those who prefer a more substantial bite. The eggless version, however, is typically lighter and airier, as the whipped cream and mascarpone provide a slightly fluffier filling. Some people even prefer this lighter texture, especially if they’re looking for a less indulgent version of the classic dessert.
In terms of flavor, both the traditional and eggless tiramisu offer the same core notes of coffee, cocoa, and mascarpone. The difference is subtle: the traditional version tends to have a slightly deeper richness, thanks to the egg yolks, while the eggless version may taste a bit fresher due to the whipped cream or custard base.
Making the Choice: Why You Might Opt for One Over the Other
The decision between traditional tiramisu and egg-free tiramisu often comes down to personal preference, convenience, and dietary concerns. Traditional tiramisu remains the classic, offering a luxurious dessert with a rich, indulgent texture and deep flavors. For those who enjoy the authenticity of the recipe and don’t mind handling raw eggs, it’s a tried-and-true option.
However, eggless tiramisu offers a safer, easier approach, especially for those with dietary restrictions or concerns about consuming raw eggs. It’s also an excellent choice for anyone who wants a slightly lighter dessert without sacrificing flavor. The egg-free version can be just as creamy and delicious, and it’s perfect for anyone looking to make tiramisu without the extra step of handling raw eggs.
Is Tiramisu Without Raw Eggs Safe and Just as Creamy?
When making tiramisu without raw eggs, two major concerns often arise: safety and texture. Many wonder if skipping the eggs will affect the dessert’s safety or its creamy texture. Let’s explore these concerns and discover why eggless tiramisu is both safe and just as creamy as the traditional version.
Safety: The Benefits of an Egg-Free Tiramisu
One of the main reasons people choose no-egg tiramisu is to avoid the risks associated with raw eggs. Raw eggs in the traditional recipe can carry the risk of salmonella and other harmful bacteria. This can lead to foodborne illness, especially for vulnerable groups, such as pregnant women, young children, the elderly, and people with weakened immune systems.
By using eggless tiramisu, you completely eliminate this risk. Instead of raw eggs, you can use heavy cream, whipped mascarpone, or custard-based fillings to achieve the same creamy texture. These alternatives are safe and easy to work with. You don’t need to worry about food safety concerns, and you can prepare the dessert more quickly and easily.
Additionally, eggless tiramisu suits people with dietary restrictions, like those avoiding eggs for health or ethical reasons. It’s also perfect for those with egg allergies or those following a vegan diet.
Creaminess: Achieving the Same Texture Without Eggs
Many wonder if eggless tiramisu can be as creamy as the traditional version. The answer is yes! You can still get that rich, velvety texture without raw eggs. The key is using the right ingredients.
In most egg-free tiramisu recipes, whipped heavy cream replaces the egg-based filling. Whipping the cream until stiff peaks form gives the dessert a light and airy texture. Mixing the whipped cream with mascarpone creates a filling that mimics the rich, creamy consistency of the classic recipe. This results in a dessert that’s just as smooth and decadent.
Some recipes may also use cream cheese or a custard-like mixture made from milk and cornstarch. These ingredients add more body and help maintain the dessert’s creamy texture. So, even without the eggs, eggless tiramisu is just as indulgent.
Texture and Flavor Comparison
The texture of eggless tiramisu is slightly lighter than the traditional version, but it’s still rich and satisfying. The egg-free filling tends to be fluffier and less dense, which some people prefer. While the classic version is heavier, the eggless version offers a more delicate mouthfeel.
In terms of flavor, both versions deliver the same delicious combination of coffee, mascarpone, and cocoa powder. The absence of raw eggs doesn’t diminish the taste. In fact, many find the eggless tiramisu a bit fresher. The whipped cream provides a lightness that doesn’t overwhelm the palate.
Can Eggless Tiramisu Compete with the Classic?
Yes, eggless tiramisu can absolutely rival the classic version. It offers a safe, creamy, and flavorful alternative. Whether you’re concerned about food safety, have dietary restrictions, or simply prefer a lighter dessert, this version delivers the same indulgence without the raw egg risks. Most importantly, it doesn’t compromise on flavor or texture.
Best Reasons to Make a Homemade Egg-Free Tiramisu
Making homemade egg-free tiramisu offers numerous benefits that go beyond just being a safer alternative to the traditional recipe. Whether you’re trying to accommodate dietary preferences, ensure food safety, or simply experiment with a lighter version of this classic dessert, there are plenty of reasons to make this eggless tiramisu from scratch. Let’s dive into some of the best reasons why homemade egg-free tiramisu is a fantastic choice.
1. Safer for Everyone, Including Vulnerable Groups
One of the most compelling reasons to make a homemade egg-free tiramisu is the food safety factor. Traditional tiramisu recipes use raw eggs, which can carry the risk of salmonella and other foodborne illnesses, especially if the eggs are not pasteurized. For pregnant women, young children, the elderly, and individuals with weakened immune systems, consuming raw eggs is not recommended due to the potential health risks.
By opting for an eggless tiramisu, you significantly reduce these risks. You can confidently serve this dessert to guests without worrying about food safety concerns. The egg-free alternative uses whipped cream, mascarpone, and custard mixtures to create that rich, creamy filling, ensuring everyone can enjoy it worry-free.
2. Perfect for Dietary Restrictions and Preferences
Another reason to consider making eggless tiramisu at home is its versatility for people with dietary restrictions. Many people need or choose to avoid eggs due to allergies, intolerances, or ethical reasons. By preparing the dessert yourself, you have complete control over the ingredients, making it easy to cater to these needs.
For vegans or those following a plant-based diet, there are plenty of substitutions for eggs in tiramisu. You can use coconut cream, vegan mascarpone, or a tofu-based filling to create a completely egg-free, dairy-free version of tiramisu. These substitutions make the dessert suitable for a wide range of diets, allowing everyone to enjoy it, no matter their restrictions.
Additionally, an egg-free tiramisu is a fantastic option for lactose-intolerant individuals. There are dairy-free mascarpone alternatives available, so you can make a tiramisu that fits the needs of those avoiding dairy products, too.
3. Easier and Less Time-Consuming to Prepare
Making egg-free tiramisu at home can also be simpler and less time-consuming than the traditional method. When using raw eggs, you must take extra steps to whisk and cook them carefully, especially if you’re worried about potential bacterial contamination. This adds time and complexity to the recipe.
However, with eggless tiramisu, the preparation process is much more straightforward. You don’t need to worry about separating eggs, cooking them to a certain temperature, or creating a delicate custard. Instead, you simply whip heavy cream, mix it with mascarpone, and layer it with coffee-soaked ladyfingers. It’s an easier, faster process that still results in a decadent dessert.
This simplicity also means that making egg-free tiramisu is perfect for busy days when you want to prepare a delicious dessert without spending hours in the kitchen.
4. Lighter Texture and Flavor
For those who find traditional tiramisu a bit too heavy, an eggless version can be a more light and airy alternative. The whipped cream creates a soft, fluffy texture that complements the rich coffee-soaked ladyfingers, resulting in a dessert that feels less dense. This lighter version allows you to indulge in tiramisu without feeling overwhelmed by its heaviness.
The lack of egg yolks also contributes to a fresher flavor. Some people find that the egg yolks in traditional tiramisu can make the dessert feel overly rich, while the egg-free recipe offers a more balanced, light flavor profile. Whether you’re serving it as a light finish to a large meal or enjoying it as a treat on its own, this eggless version is a great option.
5. Customizable to Your Taste
Another major advantage of making egg-free tiramisu at home is the level of customization it allows. You can easily tweak the recipe to suit your specific tastes. For example, you can:
- Adjust the sweetness by adding more or less sugar to the mascarpone filling.
- Experiment with flavored liqueurs like rum, amaretto, or coffee liqueur for a unique twist.
- Make it gluten-free by using gluten-free ladyfingers or another type of cookie.
- Add chocolate by sprinkling shaved chocolate or cocoa powder on top of each layer for a richer, more indulgent treat.
This flexibility allows you to create a tiramisu that is uniquely yours while ensuring it meets any dietary needs or flavor preferences.
6. Impress Guests with a Homemade Touch
Finally, there’s something special about serving a homemade egg-free tiramisu to your guests. Not only is it a safe and delicious dessert, but it also shows that you’ve put in the effort to prepare something from scratch. This homemade touch makes your dessert more personal and impressive, especially when you offer a unique, egg-free version of the classic Italian treat.
It’s a great way to showcase your culinary skills and to ensure your guests have an unforgettable experience. Whether you’re hosting a dinner party, a holiday gathering, or simply want to treat yourself, this eggless tiramisu will be a crowd-pleaser.
Key Ingredients for a Perfect Tiramisu Without Eggs

The Role of Mascarpone Cheese in Eggless Tiramisu
Mascarpone cheese is one of the key ingredients that makes tiramisu so indulgent, and it plays an essential role in the eggless version of this classic dessert. Its rich, creamy texture and mild flavor are what give tiramisu its signature silky smoothness. In an eggless tiramisu, mascarpone not only helps to achieve the perfect creamy filling but also enhances the overall flavor of the dessert.
1. Provides a Rich, Creamy Texture
In both traditional and eggless tiramisu, mascarpone is the foundation of the filling. The cheese’s natural creaminess adds depth and smoothness to the dessert. Unlike other cheeses, mascarpone has a high fat content, making it velvety and rich without being overly tangy. When you whip it with heavy cream or a similar substitute, it creates a luscious, fluffy filling that coats the ladyfingers and melts in your mouth.
The fat content in mascarpone contributes to the luxurious texture that makes tiramisu so irresistible. In the eggless version, mascarpone helps recreate the dense, creamy filling you’d typically get from whipped eggs in the traditional recipe. By folding it into whipped cream, it mimics the egg-based custard texture and gives the tiramisu a delightful mouthfeel that rivals the classic.
2. Balances the Sweetness of the Dessert
Mascarpone also plays a crucial role in balancing the overall sweetness of tiramisu. The dessert contains ingredients like sugar, coffee-soaked ladyfingers, and cocoa powder that bring strong, bold flavors. Without mascarpone, the dessert could end up too sweet or overly rich.
Mascarpone’s mild and slightly tangy flavor helps tone down the sweetness, ensuring that the flavors in the tiramisu are well-balanced. It adds a subtle savory note, which complements the sweetness of the sugar and the bitterness of the coffee. The result is a dessert that’s both rich and refined, with the perfect blend of sweet, bitter, and creamy flavors.
3. Enhances the Overall Flavor of the Tiramisu
Although mascarpone cheese doesn’t have a very strong flavor on its own, it acts as the perfect base to enhance the other ingredients in tiramisu. When mixed with coffee or espresso, mascarpone contributes to the depth of flavor in the dessert. The creamy richness of the cheese pairs beautifully with the robustness of the coffee, creating a smooth and satisfying taste that’s not too overpowering.
In an eggless tiramisu, mascarpone also helps to blend the other ingredients seamlessly. Whether you’re using whipped cream or cream cheese as substitutes for the egg yolks, mascarpone ensures that the filling is smooth and cohesive. It binds the ingredients together, creating a velvety mixture that doesn’t separate, even after refrigeration.
4. Offers Versatility and Customization
Another reason mascarpone cheese is essential in eggless tiramisu is its versatility. While mascarpone is traditionally used in its pure form, it can also be blended with other ingredients to create variations of the classic tiramisu flavor. For instance, you can mix mascarpone with flavored liqueurs like amaretto or rum to add extra layers of complexity to the dessert. This allows you to create your own unique twist on the traditional recipe.
For those with dietary preferences, mascarpone can be easily substituted with a vegan version made from plant-based ingredients. Vegan mascarpone is often made from cashews or tofu, giving you the same creamy texture and mild flavor as the traditional version, without the dairy. Whether you use regular or vegan mascarpone, this ingredient remains crucial to achieving the right texture and flavor profile.
5. Creates a Luxurious Finish to Your Tiramisu
Finally, mascarpone cheese helps elevate the appearance of your eggless tiramisu. The creamy filling made from mascarpone has a smooth, soft texture that complements the coffee-soaked ladyfingers and the sprinkling of cocoa powder. When you serve the tiramisu, its creamy layers make for a beautiful, indulgent presentation. The velvety, smooth filling is the hallmark of a perfect tiramisu and is one of the key elements that makes this dessert a showstopper.
Mascarpone’s ability to create a beautiful texture and well-rounded flavor is what makes it such an indispensable ingredient in eggless tiramisu. Whether you’re serving it for a special occasion or as an everyday treat, mascarpone ensures that your tiramisu is nothing short of luxurious.
Best Ladyfingers and Coffee Soak for a Rich Flavor
Ladyfingers and coffee soak are two critical components of tiramisu. They create the signature flavor and texture of this iconic dessert. In eggless tiramisu, choosing the right ladyfingers and preparing the perfect coffee soak is essential for the best results. Let’s look at the best ladyfingers and how to make a rich coffee soak that will elevate your dessert.
1. Choosing the Best Ladyfingers for Tiramisu
Ladyfingers are the base of tiramisu. These biscuits are light and airy, allowing them to soak up coffee without losing their shape. The right ladyfingers can make a huge difference in texture and flavor.
Soft vs. Hard Ladyfingers:
Soft ladyfingers work best for tiramisu. They absorb the coffee soak but hold their structure. Choose savoiardi if possible. These traditional Italian ladyfingers are light and delicate. If savoiardi aren’t available, look for soft, spongy ladyfingers in stores. Hard ladyfingers won’t absorb enough coffee, leaving your tiramisu too dry.
Gluten-Free and Vegan Ladyfingers:
If you need alternatives, gluten-free ladyfingers are widely available. You can also use vegan ladyfingers for dairy-free or egg-free versions. These substitutions still work well in eggless tiramisu recipes.
2. Creating the Perfect Coffee Soak for Tiramisu
The coffee soak gives tiramisu its deep, rich flavor. It’s what infuses the ladyfingers with the perfect amount of moisture and bitterness. Here’s how to make it right.
Choosing the Right Coffee:
Use strong brewed coffee or espresso for the soak. Espresso is the traditional choice and has a rich flavor. If you don’t have an espresso machine, strong coffee will work too. Choose a medium or dark roast for depth. You can also add a splash of coffee liqueur like Kahlúa for a unique twist.
How to Make the Coffee Soak:
Brew your coffee and let it cool to room temperature. Sweeten it lightly with sugar if needed. A small amount of sugar is enough; the coffee should still have a bitterness that complements the sweet mascarpone. Once cooled, dip the ladyfingers quickly into the coffee. Just a 1-2 second dip is enough. If you soak them too long, they may become soggy.
Flavoring the Coffee Soak:
For an extra touch of flavor, add a bit of vanilla extract or cinnamon to the coffee soak. These flavors won’t overpower the coffee but will add warmth and richness. Keep it subtle to enhance, not overshadow, the coffee’s natural taste.
3. The Importance of Proper Soaking
The key to great tiramisu is soaking the ladyfingers just right. If you soak them too long, they will be too soggy. If you don’t soak them enough, they will be dry. A quick dip is all you need.
When you dip the ladyfingers into the coffee, make sure they are moist but not soaked through. The ladyfingers should still hold their shape and not fall apart. This balance is crucial for getting the right texture in the finished dessert.
4. Layering the Coffee-Soaked Ladyfingers
Once the ladyfingers are soaked, it’s time to layer them in your dish. Start by placing them gently in the bottom of your dish, ensuring they are evenly spread. Then, layer the mascarpone mixture on top. Continue to alternate layers of ladyfingers and mascarpone until your dish is filled. This layering process creates the signature creamy and coffee-flavored texture that tiramisu is known for.
Best Substitutes for Eggs in Tiramisu (Heavy Cream, Custard, and More!)
Traditional tiramisu recipes often include raw eggs, specifically in the mascarpone mixture, which gives the dessert its signature creamy, velvety texture. However, there are several reasons why some people prefer to skip the eggs, including health concerns, dietary restrictions, or personal preference. Fortunately, you can still achieve a rich, indulgent tiramisu without using eggs! Let’s explore the best egg substitutes that can help you create a delicious egg-free tiramisu.
1. Heavy Cream: A Luxurious Substitute for Eggs
Heavy cream is one of the most popular substitutes for eggs in tiramisu. It adds richness and creaminess to the mascarpone mixture, providing that smooth texture you’re looking for. When combined with mascarpone, heavy cream creates a similar consistency to the traditional egg-based cream, without the need for raw eggs.
How to Use Heavy Cream:
To use heavy cream as a substitute, whip it until soft peaks form, then fold it into the mascarpone cheese. This will create a fluffy and smooth mixture. For extra stability, you can add a little bit of powdered sugar while whipping the cream to help it hold its shape.
Heavy cream gives your tiramisu a decadent and rich flavor, but it may make the dessert a bit more indulgent. You can also use whipped cream for a lighter texture, although it won’t be as stable as whipped heavy cream.
2. Mascarpone and Custard: A Silky, Egg-Free Solution
If you want a custard-like texture without using eggs, combining mascarpone cheese with custard can be a great option. Pastry cream, a custard made with milk, sugar, cornstarch, and vanilla, can mimic the texture of the egg-based filling while keeping things egg-free.
How to Make Egg-Free Custard:
To make egg-free custard, combine milk, sugar, and cornstarch in a saucepan. Heat the mixture over medium heat until it thickens. Once it has cooled, fold it into mascarpone cheese. This will give your tiramisu a smooth, creamy consistency similar to the traditional version, but without any eggs.
Another variation is to use vanilla pudding as a base for the filling. Using pre-made pudding or making your own from scratch provides a silky texture that works perfectly in an eggless tiramisu.
3. Silken Tofu: A Vegan Alternative
If you’re looking for a vegan alternative to eggs, silken tofu is a fantastic option. Silken tofu has a smooth and creamy texture that can easily replace mascarpone or egg-based fillings in tiramisu. It’s a great choice for anyone avoiding dairy and eggs, but still wanting the creamy consistency tiramisu is known for.
How to Use Silken Tofu:
Blend silken tofu until it becomes smooth and creamy. You can add vanilla extract, a little sugar, and a splash of lemon juice to help balance the flavor. Once blended, fold it into your other ingredients to create a creamy, egg-free mixture.
The tofu will give the tiramisu a unique texture, and though it won’t taste exactly like mascarpone, it will still provide a delicious base for the dessert. It’s also a healthier alternative, low in fat and rich in protein.
4. Vegan Cream Cheese: A Dairy-Free Option
Another great option for making egg-free tiramisu is vegan cream cheese. This substitute is perfect for anyone following a dairy-free or vegan diet. Vegan cream cheese has a similar texture and flavor to mascarpone and works wonderfully in tiramisu.
How to Use Vegan Cream Cheese:
To use vegan cream cheese, simply mix it with a bit of coconut cream or almond milk to achieve a smooth consistency. You can also add a little sugar to help sweeten the mixture. The vegan cream cheese will provide a tangy, creamy texture, making it a great egg-free alternative to mascarpone.
5. Aquafaba: A Surprising Yet Effective Egg Substitute
Aquafaba, the liquid from canned chickpeas or beans, can be used as a surprising but effective substitute for eggs in tiramisu. While it might sound unusual, aquafaba has a similar texture to egg whites when whipped and can be used to create a light, airy consistency in the mascarpone filling.
How to Use Aquafaba:
To use aquafaba, simply whip it with an electric mixer until it forms stiff peaks. Then fold it into the mascarpone mixture to add lightness and fluffiness. You can also add a bit of cream of tartar to stabilize the aquafaba if needed. While aquafaba doesn’t contribute much flavor, it helps in creating a fluffy texture that is essential for tiramisu.
6. Coconut Cream: For a Tropical Twist
If you’re looking to add a tropical twist to your egg-free tiramisu, consider using coconut cream as a substitute. Coconut cream has a rich and creamy texture, making it an excellent option for those looking for a dairy-free alternative. It also gives the tiramisu a slight coconut flavor that can be a fun variation.
How to Use Coconut Cream:
Use full-fat coconut cream for the best results. Chill the coconut cream in the fridge overnight, then scoop out the thickened cream and whip it until smooth. You can then fold it into your mascarpone or use it on its own for a unique twist on the classic dessert. Keep in mind that the coconut flavor will be present, so make sure you like it!
Cocoa Powder and Toppings to Finish Your Egg-Free Dessert
The final touch of cocoa powder and toppings can truly elevate the presentation and flavor of your egg-free tiramisu. While the creamy layers of mascarpone and coffee-soaked ladyfingers create the foundation, the finishing touches are what give this dessert its signature look and flavor. Let’s dive into how to use cocoa powder and explore some fun and delicious topping options to make your egg-free tiramisu even more irresistible.
1. Choosing the Right Cocoa Powder for a Rich Flavor
Cocoa powder is a key ingredient in tiramisu, adding a bittersweet contrast to the creamy layers. When it comes to cocoa powder, quality matters. Look for unsweetened, high-quality cocoa powder to get the most flavor out of this finishing touch. Dutch-processed cocoa powder has a smoother and less acidic taste compared to regular cocoa powder, and it’s often the preferred choice for tiramisu due to its deeper flavor.
How to Use Cocoa Powder:
To top your egg-free tiramisu, simply dust the cocoa powder over the final layer of mascarpone filling. You can use a fine mesh sieve to ensure an even and delicate coating. This not only enhances the visual appeal but also balances the sweetness of the dessert with its rich, slightly bitter taste.
For a more dramatic presentation, you can stencil cocoa powder over the surface of your tiramisu, creating fun designs or patterns. This adds an extra layer of creativity to your dessert.
2. Alternative Toppings to Add Texture and Flavor
While cocoa powder is traditional, there are many other toppings that can add texture, flavor, and visual interest to your egg-free tiramisu. Here are a few options to consider:
Chocolate Shavings or Grated Chocolate:
For a touch of indulgence, grate some dark chocolate over the top of your tiramisu. The richness of dark chocolate pairs beautifully with the coffee-soaked ladyfingers and mascarpone mixture. You can use a vegetable peeler to create thin curls of chocolate, or grate it into fine shavings for a more subtle effect. This topping not only adds texture but also enhances the overall chocolate flavor of the tiramisu.
Fresh Berries or Fruit:
If you’re looking to add a fresh and light element to balance out the richness of tiramisu, consider adding fresh berries like raspberries, strawberries, or blueberries. The acidity and sweetness of the fruit contrast perfectly with the creamy layers of tiramisu, and the vibrant colors make for an attractive garnish. You could even layer some fruit between the layers for an unexpected surprise.
Shredded Coconut:
For a tropical twist, shredded coconut is an excellent option. Lightly toast the coconut for a bit of crunch, and sprinkle it on top of the tiramisu before serving. The coconut adds both flavor and texture, providing a nice contrast to the creamy and soft layers.
Crushed Nuts (Hazelnuts, Almonds, or Pistachios):
If you want to add some crunch and a nutty flavor, crushed nuts like hazelnuts, almonds, or pistachios can work beautifully. Toast them lightly to bring out their flavor, and sprinkle them over the top of the tiramisu just before serving. The nuttiness complements the sweetness of the mascarpone filling and adds a delightful textural contrast to each bite.
Toffee or Caramel Drizzle:
For an extra decadent touch, drizzle some caramel sauce over the top of your tiramisu. The sweet, buttery flavor of caramel pairs wonderfully with the bitterness of coffee and the richness of mascarpone. You can use store-bought caramel or make your own for an added homemade touch.
3. Adding Liqueurs or Flavored Syrups for an Extra Kick
Another way to elevate your egg-free tiramisu is by infusing the dessert with a bit of flavored syrup or liqueur. This adds depth and complexity to the flavor profile, and it’s a great way to give your tiramisu a personal twist.
Coffee Liqueur (e.g., Kahlúa):
One of the most popular choices for tiramisu is coffee liqueur, such as Kahlúa. A drizzle of Kahlúa on top of your tiramisu adds an extra layer of coffee flavor, along with a touch of sweetness and alcohol. It enhances the richness of the coffee-soaked ladyfingers and creates a smooth, aromatic finish.
Amaretto or Marsala Wine:
Amaretto is another excellent option for adding a nutty, slightly sweet flavor to tiramisu. It pairs well with both coffee and chocolate, enhancing the dessert’s overall complexity. Marsala wine, a classic Italian choice, also adds a sophisticated depth of flavor to tiramisu. Just a splash on top of your dessert will bring it to the next level.
Flavored Syrups (Vanilla, Hazelnut, or Caramel):
If you prefer something non-alcoholic, you can experiment with flavored syrups like vanilla syrup, hazelnut syrup, or caramel syrup. A small drizzle over the top will add an extra layer of sweetness and flavor without overpowering the traditional taste of tiramisu. These syrups work well if you’re aiming for a more accessible, family-friendly dessert.
4. Garnishing with Chocolate Dust or Edible Gold for a Luxury Touch
For a special occasion or if you want to make your egg-free tiramisu truly stand out, consider adding chocolate dust or even edible gold leaf. Chocolate dust is simply finely ground cocoa or even finely grated chocolate that you can sprinkle lightly over the top for a sophisticated finish. If you’re feeling adventurous and want to make the tiramisu extra luxurious, a few pieces of edible gold leaf can make your dessert look truly extravagant and memorable.
Step-by-Step Guide to Making the Best No-Egg Tiramisu
Preparing the Coffee-Soaked Ladyfingers for Maximum Flavor
The coffee-soaked ladyfingers are a critical component of tiramisu. They provide the dessert with its signature texture, soaking up the rich coffee and forming the base for the creamy mascarpone layers. To ensure they absorb the perfect amount of coffee and retain a soft yet structured texture, the preparation of the ladyfingers is key. Here’s how to get the best flavor and consistency from your ladyfingers.
1. Choosing the Right Coffee for Soaking
The type of coffee you use will directly impact the flavor of the ladyfingers. Strong, freshly brewed coffee is essential for a rich and bold taste. While espresso is traditionally used in tiramisu for its concentrated flavor, you can also use strong brewed coffee if you prefer a milder, less intense coffee flavor.
- Espresso: For a more authentic, Italian taste, espresso is the go-to option. It’s rich, aromatic, and packs a punch that complements the sweetness of the mascarpone and the light crunch of the ladyfingers.
- Coffee Blend: If espresso is too strong for your preference, a dark roast coffee blend also works well. Just make sure the coffee is strong enough to give the ladyfingers a deep coffee flavor without being too diluted.
Tip: Use freshly brewed coffee to ensure the best taste. Avoid using instant coffee as it can lack the depth of flavor needed for tiramisu.
2. The Perfect Coffee-to-Ladyfinger Soak Ratio
The soaking process is where many bakers go wrong. It’s essential that the ladyfingers are properly soaked but not too soggy. The key is to dip them briefly in the coffee so they absorb just enough liquid to soften but retain their structure.
- Dip Time: Dip each ladyfinger in the coffee for just 1 to 2 seconds. If you soak them for too long, they will turn mushy and fall apart. If you don’t soak them enough, the ladyfingers may remain too dry and not absorb enough of the coffee flavor.
- Even Dipping: To ensure an even soak, dip each ladyfinger quickly into the coffee, turning it slightly to ensure both sides are coated. Use a shallow dish for the coffee to allow for quick dipping. Avoid soaking them in a deep mug, as this can result in uneven absorption.
Tip: For a perfect soak, make sure your coffee is at room temperature, not too hot. This will prevent the ladyfingers from becoming too soggy too quickly.
3. Enhancing the Coffee with Liqueurs or Flavored Syrups
While traditional tiramisu often calls for coffee and a hint of coffee liqueur (such as Kahlúa), you can experiment with various flavors to personalize the coffee soak. Here are some great options:
- Coffee Liqueur (Kahlúa or Tia Maria): Adding a splash of coffee liqueur enhances the depth of flavor and gives your tiramisu a slight alcoholic kick. The rich coffee flavor complements the bitterness of the coffee and provides an added layer of complexity. You can add about 1/4 cup of coffee liqueur to 2 cups of brewed coffee to infuse it with extra flavor.
- Amaretto or Marsala Wine: For an Italian twist, consider using Amaretto or Marsala wine to enhance the flavor. Amaretto adds a nutty, sweet kick, while Marsala wine imparts a complex, slightly fruity taste to the coffee soak.
- Vanilla Syrup or Hazelnut Syrup: If you prefer a non-alcoholic option, you can add a flavored syrup such as vanilla or hazelnut to the coffee. Just a tablespoon or two will add a subtle flavor profile, making your tiramisu stand out with a unique twist.
Tip: If you’re making an egg-free tiramisu, flavored liqueurs like Amaretto or Marsala wine can add a lovely depth without overpowering the dessert’s delicate balance of flavors.
4. Layering the Coffee-Soaked Ladyfingers
Once the ladyfingers are dipped in the coffee mixture, it’s time to layer them in your dish. The way you layer the soaked ladyfingers is just as important as how you soak them.
- Layering in Rows: Lay the soaked ladyfingers side by side in neat rows at the bottom of your serving dish. Make sure they fit snugly to avoid gaps. If your dish is round, you may need to break a few ladyfingers to fill in the corners, but this won’t affect the flavor.
- Avoid Overcrowding: Be sure not to overcrowd the ladyfingers. They need a bit of room for the mascarpone mixture to be spread over them evenly.
- Add More Layers: For a traditional tiramisu, you will typically need two layers of soaked ladyfingers, alternating with layers of creamy mascarpone filling. Be mindful of the number of layers you have, as this will affect the texture and balance of the dessert.
Tip: If you want to create a more visually striking dessert, you can alternate the direction of the ladyfingers in each layer (one layer horizontally, the next layer vertically). This adds a unique, woven look to your tiramisu.
5. Allowing the Soaked Ladyfingers to Rest
After assembling your tiramisu with the soaked ladyfingers and mascarpone layers, it’s important to let the dessert rest and set in the fridge for several hours, or overnight if possible. This resting time allows the ladyfingers to fully absorb the coffee and mascarpone flavors, ensuring a smooth and creamy texture.
The longer you let the tiramisu rest, the more the flavors will meld, resulting in a more flavorful dessert. The ladyfingers will soften further, becoming tender and giving the tiramisu its characteristic melt-in-your-mouth texture.
By carefully preparing the coffee-soaked ladyfingers and using high-quality coffee and flavor-enhancing ingredients, you’ll ensure that your egg-free tiramisu is full of rich coffee flavor and has the perfect texture. These small details can make a big difference in the overall result, creating a tiramisu that’s every bit as indulgent and delicious as the traditional version.
How to Make the Creamy Tiramisu Filling Without Eggs
The filling is the heart and soul of tiramisu. In a traditional recipe, eggs are used to create a smooth, creamy texture, but making an egg-free filling can yield the same luxurious result with just a few simple ingredients. Here’s how to create a rich, velvety egg-free tiramisu filling that’s both safe and delicious.
1. Start with Quality Mascarpone Cheese
The key to a successful eggless tiramisu filling is the mascarpone cheese, which provides the creamy, luscious base. Mascarpone is a rich, soft Italian cheese with a mild, slightly sweet flavor that is essential for authentic tiramisu. It’s what gives the dessert its indulgent, melt-in-your-mouth texture.
- What to Look for in Mascarpone: Choose a high-quality, full-fat mascarpone. Lower-fat mascarpone can result in a less creamy filling that lacks the richness needed for the dessert.
- Room Temperature Cheese: For the best texture, allow your mascarpone to come to room temperature before mixing. Cold mascarpone can be difficult to blend smoothly into the filling.
Tip: If you can’t find mascarpone at your local store, you can make a substitute by blending cream cheese with heavy cream, but mascarpone remains the best choice for the traditional flavor and texture.
2. Substitute Eggs with Heavy Cream
Since the eggs are typically used to create a stable, smooth texture, the substitute needs to provide similar consistency and fluffiness. Heavy cream is the perfect alternative because it adds both richness and structure.
- Whipping the Cream: Start by whipping the heavy cream until stiff peaks form. This will give the filling the same airiness and lightness that eggs would traditionally provide. Be careful not to overwhip the cream, as it can become grainy or even start to turn into butter.
- Fold Gently: Once the cream is whipped, fold it gently into the mascarpone mixture. The goal is to maintain the fluffiness of the whipped cream while ensuring it combines smoothly with the mascarpone cheese for that perfectly creamy filling.
Tip: For an extra rich and decadent filling, you can add a bit of powdered sugar to the whipped cream. This will enhance the sweetness and contribute to a thicker texture.
3. Add a Sweetener and Flavor Enhancers
To balance the tanginess of the mascarpone and heavy cream, you’ll need a sweetener, as well as flavorings that enhance the overall taste.
- Sweetener: Traditionally, tiramisu uses granulated sugar to sweeten the filling. You can use powdered sugar for a smoother texture that dissolves more easily in the mascarpone mixture. Alternatively, you can substitute with honey or maple syrup if you prefer a natural sweetener.
- Vanilla Extract: A splash of vanilla extract brings warmth and depth to the filling. It balances the richness of the mascarpone and whipped cream, adding a fragrant, comforting aroma.
- Liquor (Optional): If you enjoy the traditional kick of tiramisu, adding a tablespoon of coffee liqueur (like Kahlúa or Tia Maria) or rum enhances the flavor profile. The alcohol adds a subtle complexity without overpowering the dessert.
Tip: For a unique twist, you can use almond extract or hazelnut liqueur in place of vanilla for an extra layer of flavor that complements the coffee-soaked ladyfingers.
4. Combining the Ingredients for a Silky Texture
Now that you have all the components, it’s time to create the creamy filling. Start by mixing the mascarpone and sweeteners together until smooth. Use an electric mixer for an easy, lump-free result. Once the mascarpone mixture is smooth, gently fold in the whipped heavy cream.
- Fold, Don’t Stir: Avoid using a whisk or stirring the mixture too aggressively. This will deflate the whipped cream and prevent the filling from achieving the light, airy texture needed for tiramisu. Folding the cream in ensures that air pockets are preserved, which is crucial for the filling’s fluffy consistency.
- Taste and Adjust: Before assembling your tiramisu, taste the filling and adjust the sweetness or flavoring to your preference. If it needs more sweetness, add a little more powdered sugar, or if you want a more pronounced flavor, consider adding more vanilla or liqueur.
Tip: Make sure that the filling is smooth and has a thick, creamy texture, but it should also be spreadable. If it feels too stiff, you can add a small amount of milk or cream to loosen it up.
5. Chill the Filling for the Best Texture
Once your filling is made, it’s important to chill it in the refrigerator for at least 30 minutes before assembling the tiramisu. Chilling allows the flavors to meld and the texture to set. The cold filling will be easier to spread over the coffee-soaked ladyfingers, ensuring a neat, even layer.
Tip: The filling can be made up to one day in advance and kept in the fridge. This not only saves time but allows the flavors to develop and the texture to improve.
By following these steps, you can create a smooth, creamy tiramisu filling without eggs that is every bit as indulgent as the traditional version. The use of mascarpone, whipped cream, and flavor-enhancing ingredients ensures that the filling is rich and velvety, while the eggless method provides a safer, more accessible dessert option. Whether you’re making tiramisu for dietary reasons or simply prefer a simpler recipe, this egg-free filling will deliver the creamy, luxurious texture everyone loves.
Layering Your Eggless Tiramisu for the Perfect Texture
The art of layering tiramisu is what creates the beautiful contrast of soft, creamy filling and coffee-soaked ladyfingers. When making an eggless tiramisu, getting the layering just right is essential for achieving the signature texture that makes this dessert so irresistible. Here’s how to layer your egg-free tiramisu to perfection.
1. Start with a Solid Base
The first step to layering your tiramisu is creating a solid base that will support the layers above it. This initial layer will also soak up some of the coffee, making it rich and flavorful.
- Use a Good Baking Dish: A traditional rectangular or square dish works best for layering tiramisu, as it allows you to fit the ladyfingers neatly. Choose a dish that’s about 8×8 inches or 9×13 inches in size for an ideal balance between the filling and the layers.
- First Layer of Ladyfingers: Begin by quickly dipping the ladyfingers into your coffee soak. You don’t want to soak them too long, as they can become soggy and fall apart. Aim for about 1-2 seconds per ladyfinger to get them lightly soaked but not soggy. Arrange them in a single layer across the bottom of the dish. Make sure the ladyfingers are snug against each other, with no gaps between them.
Tip: If you’re using store-bought ladyfingers, check the brand’s texture. You want them to be light and crisp enough to hold up under the coffee soak. Homemade ladyfingers often work better because they have the right amount of structure.
2. Spread the Creamy Egg-Free Filling Evenly
Once you’ve placed the first layer of coffee-soaked ladyfingers, it’s time to spread the creamy, egg-free filling over them. This layer should be thick, smooth, and even, creating the perfect balance between the filling and the ladyfingers.
- Use an Offset Spatula: To spread the filling smoothly, use an offset spatula. This tool helps you spread the mixture evenly without disrupting the delicate ladyfingers underneath. Start at the center of the dish and spread the filling outward toward the edges, ensuring that it covers all the ladyfingers completely.
- Smooth, Thick Layer: Aim for about 1-inch thick layer of the filling. If your filling has been properly whipped, it should be easy to spread without it running or falling apart. Don’t rush this step; an even layer is key to achieving the perfect tiramisu texture.
Tip: If you notice the filling is too thick to spread easily, you can add a little bit of cream or milk to loosen it up, but make sure it still holds its shape.
3. Repeat the Layers for a Balanced Texture
Layering is the key to achieving the perfect texture in tiramisu. The combination of ladyfingers and the creamy filling creates a light and rich contrast that is both fluffy and indulgent.
- Second Layer of Ladyfingers: After spreading the first layer of filling, add another layer of coffee-soaked ladyfingers. Just like the first layer, dip the ladyfingers quickly into the coffee soak and arrange them evenly across the dish. Ensure the layer of ladyfingers is straight and flat so that the next layer of filling can be applied smoothly.
- Second Layer of Filling: Spread the second layer of egg-free filling on top of the ladyfingers. This layer should be just as thick as the first, ensuring that the layers are balanced. Be gentle when spreading to avoid displacing the ladyfingers underneath.
Tip: If you are working with a deeper dish, you can add a third layer of ladyfingers and filling. For most recipes, however, two layers of each are sufficient to get the right texture.
4. Smooth the Top for a Clean Finish
Once you’ve finished layering the ladyfingers and the creamy filling, it’s time to make the top layer as smooth and polished as possible.
- Final Layer of Filling: The final layer should be the creamy filling. Smooth it out with the offset spatula, ensuring that the top is even and neat. The top should be higher than the edge of the ladyfingers, giving the dessert a full, rich look.
- Avoid Overcrowding: Ensure the top layer is level without any peaks or valleys, as this will give the tiramisu a sleek, professional finish. You want the filling to cover the entire surface and maintain a flat, smooth top.
Tip: If you find any air pockets or uneven areas in your layers, use the spatula to gently press them out. This will help keep the layers tightly packed and ensure an even distribution of flavors throughout the dessert.
5. Chill the Tiramisu to Set the Layers
Once your tiramisu is fully layered, the last step is to allow it to chill in the refrigerator for at least 4 hours, or ideally overnight. Chilling the dessert is crucial for the layers to set and the flavors to meld together. The longer you let it chill, the firmer the layers will become, resulting in a more defined, structured dessert.
- Why Chilling Is Important: Chilling allows the mascarpone filling to firm up and the coffee-soaked ladyfingers to absorb the flavors fully. The layers will stay intact when you cut into the dessert, giving you clean slices with well-defined layers.
Tip: Avoid trying to rush the chilling process. Giving your tiramisu enough time to set will help it hold together when served and give the dessert its full flavor.
By following these steps and paying attention to the details, you’ll create a beautifully layered eggless tiramisu with perfect texture in every bite. The layers of coffee-soaked ladyfingers combined with a creamy, egg-free filling will give you the luxurious, indulgent tiramisu that everyone loves, without the need for raw eggs. With the right balance of layers, you’ll create a dessert that’s both visually stunning and absolutely delicious.
Chilling and Serving Tips for a Delicious No-Bake Dessert
Chilling and serving your eggless tiramisu properly is essential for ensuring it achieves the perfect texture and flavor. Since tiramisu is a no-bake dessert, the time it spends in the fridge allows all the layers to set and the flavors to meld together. Here are some essential chilling and serving tips to help you serve your tiramisu at its best.
1. Give Your Tiramisu Enough Time to Chill
One of the most important steps in making the perfect tiramisu is allowing it to chill long enough for the flavors to meld and the texture to firm up. Tiramisu should be chilled in the fridge for at least 4 hours, though overnight chilling is the ideal option.
- Why Chilling Matters: The cold temperatures help the mascarpone and whipped cream filling set, allowing the layers to hold their shape when served. Without sufficient chilling, the layers may not stay intact, and the texture could be too soft, making it hard to cut neat portions. Chilling also gives the coffee flavor time to infuse into the ladyfingers, intensifying the overall taste of the dessert.
- Overnight Chilling: For the best results, let the tiramisu chill for 8 to 12 hours. This longer chilling time allows the flavors to deepen, creating a richer and more complex dessert. If you need to prepare it in advance, making tiramisu the night before and letting it sit overnight is a great strategy.
Tip: If you’re short on time, aim for a minimum of 4 hours of chilling, but for the most balanced and flavorful dessert, let it rest in the fridge overnight.
2. Use Plastic Wrap or a Lid for Proper Storage
While chilling your tiramisu, it’s important to cover it properly to prevent it from absorbing unwanted odors from the fridge. You can do this by using either plastic wrap or a lid.
- Covering with Plastic Wrap: If your dish doesn’t come with a lid, use plastic wrap to cover the tiramisu. Make sure the wrap touches the surface of the dessert to prevent it from forming a skin or drying out. This also keeps the flavors sealed in and ensures the top layer of the filling stays smooth and creamy.
- Airtight Containers: If you’re preparing the tiramisu in a sealable container, make sure the lid is tightly secured to maintain the freshness of the dessert and avoid contamination from other food in the fridge.
Tip: When covering with plastic wrap, you can press the wrap directly onto the surface of the tiramisu to create a vacuum-seal effect, keeping it fresh and preventing any air exposure.
3. Serving Temperature – Let It Sit for a Few Minutes Before Serving
Tiramisu is best served chilled, but it should not be too cold when served. Taking it out of the fridge 15 to 20 minutes before serving allows the flavors to bloom more fully and the filling to soften just enough for a creamy texture. If you serve it directly from the fridge, the filling can be a bit too firm, and the flavors might not come through as clearly.
- Allowing It to Rest: Let your tiramisu rest at room temperature for a few minutes before cutting and serving. This helps the dessert settle and makes it easier to cut clean portions.
- Avoid Overheating: While letting it sit out briefly helps bring out the flavor, don’t leave it out too long, especially on a hot day. If the tiramisu is left out in warm conditions for an extended period, it may start to soften too much and lose its firm, creamy texture.
Tip: If you’ve made your tiramisu ahead of time and it’s been chilling in the fridge, it will be ready to serve after a short rest at room temperature, making it the perfect make-ahead dessert for any occasion.
4. Garnish Just Before Serving for the Freshest Look
For the best presentation and taste, it’s a good idea to add the garnishes just before serving. This ensures that the toppings stay fresh and don’t become soggy after sitting in the fridge for an extended period.
- Cocoa Powder: A dusting of unsweetened cocoa powder is the classic topping for tiramisu. Use a fine mesh sieve to sprinkle a thin, even layer on top of the dessert. Be sure to do this step right before serving to keep the cocoa powder fresh and not absorbed into the filling.
- Chocolate Shavings or Grated Chocolate: For a little extra decadence, shave some dark chocolate or grate chocolate over the top of your tiramisu. This adds texture and an extra burst of flavor, making the dessert even more indulgent.
- Coffee Beans or Cocoa Nibs: For an added touch, you can also garnish with a few whole coffee beans or cocoa nibs. These not only look elegant but also add a bit of crunch and an extra hint of flavor that pairs beautifully with the creamy tiramisu.
Tip: Use a small sieve to dust cocoa powder evenly on the surface of the tiramisu for a refined look. You can also dust it directly before serving to prevent the powder from getting too moist while chilling.
5. Cutting and Serving – Get Neat, Defined Slices
After your tiramisu has chilled and been garnished, it’s time to serve it. When cutting tiramisu, it’s important to use the right tools and technique to ensure you get neat, defined slices.
- Use a Sharp Knife: A sharp knife is essential for cutting tiramisu cleanly. Dipping the knife in warm water before slicing will help it slide through the layers more easily without dragging or tearing the dessert. Wipe the knife clean between each cut to keep the slices neat.
- Portion Size: Tiramisu is rich, so small portions are ideal. Depending on the size of your dish, aim to serve small to medium slices. Typically, tiramisu is served in 2 to 3-inch portions to ensure each bite is satisfying without being overwhelming.
Tip: If you prefer individual servings, consider serving tiramisu in small glass jars or dessert cups. This not only adds a charming presentation but also makes it easier to serve single portions.
6. Storing Leftovers – Keep It Fresh
If you have any leftovers, it’s important to store them properly to maintain the dessert’s flavor and texture.
- Refrigeration: Keep leftover tiramisu tightly covered in the fridge. It should stay fresh for up to 2-3 days. However, for the best texture and flavor, it’s recommended to consume it within 24 hours.
- Freezing: Tiramisu can also be frozen if you want to store it for a longer period. However, be aware that freezing may affect the texture of the cream and ladyfingers. To freeze, cover the tiramisu tightly with plastic wrap and then place it in an airtight container. It can be stored for up to 2-3 weeks. When ready to eat, allow it to thaw in the fridge overnight before serving.
Tip: If you’re freezing portions, it’s best to freeze them in individual servings, making it easier to thaw just the amount you need.
By following these chilling and serving tips, you’ll be able to enjoy a perfect serving of your eggless tiramisu every time. Proper chilling enhances the texture, allowing the tiramisu to firm up while keeping the layers smooth and creamy. With careful garnishing, thoughtful portioning, and a little extra time to rest, your no-bake tiramisu will look and taste as good as it does in the best Italian restaurants.
Expert Tips for the Best Homemade Tiramisu Without Raw Eggs
Choosing the Best Mascarpone for a Smooth and Creamy Texture
Mascarpone cheese is the key ingredient that gives tiramisu its signature creamy texture and rich flavor. It plays a pivotal role in ensuring that your eggless tiramisu is smooth, velvety, and indulgent. With so many varieties available in stores, it’s important to select the right mascarpone to achieve the best result. Here’s a detailed guide to help you choose the best mascarpone for your egg-free tiramisu.
1. Look for High-Quality Mascarpone Cheese
The quality of mascarpone cheese you choose can greatly affect the texture and flavor of your tiramisu. High-quality mascarpone will create a rich, smooth, and creamy filling, while lower-quality options can result in a more grainy texture and less flavorful dessert.
- Full-Fat Mascarpone: Opt for full-fat mascarpone whenever possible. It has the ideal consistency and richness for tiramisu. Low-fat versions or substitutes may seem like a healthier choice, but they often lack the smooth, creamy texture and can lead to a less indulgent dessert.
- Avoid Imitation Mascarpone: Some brands sell imitation mascarpone that is made with vegetable oils and other ingredients. While these options might be cheaper, they don’t offer the same creamy texture or authentic flavor as real mascarpone cheese. Always check the ingredient list for heavy cream and milk as the primary ingredients to ensure you’re getting the real deal.
Tip: If you’re using mascarpone from a local dairy producer or a specialty store, it may be fresher and have a better texture compared to mass-market brands.
2. Consider the Texture – Creamy vs. Grainy
Mascarpone cheese should be smooth and creamy, with a soft, spreadable consistency. When selecting mascarpone for tiramisu, feel the texture by opening the container (if possible) to ensure it has the right consistency.
- Smooth and Lush: A high-quality mascarpone will spread easily, without lumps or curds. It should have a velvety texture that blends seamlessly with the other ingredients in the tiramisu filling.
- Avoid Grainy or Waterlogged Mascarpone: Some mascarpone varieties can become grainy or waterlogged if stored improperly or if they’re not fresh. If the mascarpone seems too watery or grainy, it can result in a less-than-ideal consistency in your tiramisu filling. Look for mascarpone that has a firm yet soft consistency and avoid ones that are too runny or solidified.
Tip: If your mascarpone has separated or become too runny, you can gently whisk it before using to restore its smoothness. Avoid over-mixing, though, as it can change the texture of the cheese.
3. Check for Freshness and Expiration Date
Mascarpone is a dairy product and has a relatively short shelf life, so it’s crucial to check the expiration date before purchasing. Old mascarpone can have a sour or off flavor, which will negatively impact the overall taste of your tiramisu.
- Fresh Mascarpone: Always opt for mascarpone that is as fresh as possible. Fresh mascarpone will have a mild, creamy flavor and a luxurious texture. Avoid buying mascarpone that is close to its expiration date, as it might not hold up well in your tiramisu.
- Signs of Spoilage: If you notice any separation, unpleasant smell, or curdling, it’s best to discard the mascarpone. The cheese should have a subtle, sweet aroma and a soft, smooth texture. If it’s past its prime, it will affect the overall flavor and creaminess of your tiramisu.
Tip: When you’re at the store, check the storage conditions of the mascarpone. It should be kept refrigerated at all times. If you find mascarpone sitting on a shelf at room temperature, it’s likely not fresh and may be a sign of improper storage.
4. Consider the Brand – Some Top Picks
When it comes to mascarpone, certain brands are known for their consistent quality and texture. Some of the most highly regarded mascarpone brands include:
- BelGioioso Mascarpone: Known for its smooth, creamy texture, BelGioioso mascarpone is a popular choice for making tiramisu and other Italian desserts. It’s widely available in many grocery stores and has a mild, creamy flavor.
- Galbani Mascarpone: Another trusted brand, Galbani mascarpone is rich and creamy with a luxurious texture, making it ideal for tiramisu. It is consistently praised for its ability to blend seamlessly into the dessert filling.
- Tine Mascarpone: Tine mascarpone is a top-quality brand that delivers a smooth and firm texture. It’s a favorite among professional chefs and home bakers alike for its reliability and consistency.
- Organic or Artisan Mascarpone: If you’re looking for a more artisanal option, some organic dairy producers offer mascarpone made from high-quality milk and cream. These mascarpone varieties often have a richer flavor and smoother texture, perfect for adding a unique twist to your tiramisu.
Tip: Check reviews and ratings for different mascarpone brands before making a purchase. If you’re new to mascarpone, starting with a well-known and reputable brand can help you get the best result.
5. Alternative Mascarpone Options
If you’re unable to find mascarpone or are looking for a dairy-free alternative, there are several substitutes that can provide a similar creamy texture, though the flavor will be slightly different. Some options include:
- Cream Cheese with Heavy Cream: Combining cream cheese with heavy cream can mimic the smoothness of mascarpone, though it will have a tangier flavor. Use a ratio of 2 parts cream cheese to 1 part heavy cream, and blend until smooth.
- Ricotta Cheese and Whipped Cream: For a lighter mascarpone substitute, ricotta cheese blended with whipped cream can offer a similar texture but with a slightly grainier consistency. It’s a good option if you prefer a less rich dessert.
- Non-Dairy Alternatives: For a vegan tiramisu, use coconut cream or cashew cream in place of mascarpone. These alternatives won’t mimic the exact flavor, but they can provide a creamy texture.
Tip: If using a substitute, keep in mind that the flavor of your tiramisu will change slightly. Make sure to adjust other ingredients, such as sweetness or flavorings, to achieve the best result.
By carefully selecting the best mascarpone, you ensure that your eggless tiramisu has the rich, creamy texture that makes this Italian dessert so irresistible. Whether you opt for a traditional, high-quality mascarpone or explore dairy-free alternatives, the right choice of cheese will elevate your tiramisu and make it a memorable treat for any occasion.
The Best Coffee for Tiramisu
The coffee you choose for tiramisu plays a significant role in achieving that rich, bold flavor that complements the creaminess of mascarpone and the sweetness of ladyfingers. Here are the best options:
- Espresso: The traditional and most authentic choice is espresso, as it offers a deep, concentrated flavor. It provides the bitterness that balances the sweetness of the dessert and pairs perfectly with the creamy mascarpone.
- Brew your own espresso: If you have an espresso machine, brewing a fresh cup will give you the strongest flavor, ideal for tiramisu.
- Pre-brewed espresso: In the absence of an espresso machine, you can use store-bought pre-brewed espresso. However, it’s essential to use a strong, freshly brewed version for the best taste.
- Strong Coffee Substitute: If you don’t have an espresso machine, strong brewed coffee is an excellent substitute. Opt for a dark roast that provides bold, deep flavors. Brew it strong using a French press or coffee maker.
- Coffee-to-water ratio: Use about one tablespoon of coffee grounds per ounce of water to ensure a strong brew, which mimics the intensity of espresso.
- Cold Brew Coffee: Cold brew is another great alternative that’s less acidic but still robust. It’s smoother than hot coffee and can complement the mascarpone and ladyfingers without overwhelming the flavor.
Tip: Let your coffee cool completely before soaking the ladyfingers to avoid sogginess or melting the mascarpone.
Choosing the Right Liquor for Authentic Flavor
The alcohol used in tiramisu adds depth and warmth to the dessert, bringing the coffee and mascarpone together. Here’s how to choose the best liquor:
- Marsala Wine:Marsala is the most traditional alcohol used in tiramisu. It offers a rich, slightly sweet flavor that pairs perfectly with the bitterness of coffee and the richness of mascarpone.
- Sweet Marsala: Choose sweet Marsala for a balanced flavor profile. It enhances the dessert’s sweetness while providing the depth needed to complement the other flavors.
- Rum:Dark rum adds warmth and a subtle spice to tiramisu. It pairs well with the coffee and mascarpone filling, creating a robust flavor profile. Dark rum has a richer taste than light rum, making it ideal for this dessert.
- Rum substitutes: If you don’t have rum, brandy can be used as an alternative, offering a similar richness and warmth.
- Kahlúa (Coffee Liqueur): For those who love coffee, Kahlúa is an excellent choice. Its coffee flavor enhances the coffee-soaked ladyfingers and adds a layer of sweetness.
- Amaretto: This almond-flavored liqueur adds a gentle nutty sweetness. While not traditional, amaretto works wonderfully for those seeking a unique twist.
Tip: If you’re making a non-alcoholic version, use extra brewed coffee or coffee syrup to maintain the flavor without the alcohol.
Alcohol-Free Tiramisu – How to Make It Kid-Friendly
Tiramisu is traditionally made with alcohol, which may not be suitable for everyone, especially kids. However, you can easily transform this adult dessert into a delicious, kid-friendly treat by removing the alcohol and using some simple substitutions. The key is to maintain the dessert’s signature flavor while making it appropriate for young palates. Let’s explore how to make a delicious, alcohol-free tiramisu that kids will love!
1. Replace the Alcohol with Coffee Syrup or Flavored Extracts
The alcohol in traditional tiramisu is usually a key part of the flavor profile, but it can be easily substituted with ingredients that still capture the essence of the dessert without any alcohol content. Here are some options:
- Coffee Syrup: Instead of using Marsala wine or rum, replace it with coffee syrup or coffee-flavored syrup. This syrup is rich and sweet, and it can mimic the bold coffee flavor you want while keeping it alcohol-free. You can easily find it in stores or make it at home by simmering brewed coffee with sugar until it thickens into a syrup.
- Flavored Extracts: If you prefer a more subtle coffee flavor, you can use coffee extract or vanilla extract. A few drops of either extract added to your coffee will enhance the flavor without adding alcohol. Hazelnut extract is another great option for adding a unique and sweet twist that kids will enjoy.
2. Skip the Liquor in the Soaking Solution
Traditional tiramisu recipes call for alcohol in the soaking liquid for the ladyfingers. For a kid-friendly version, you can eliminate the alcohol entirely by making a simple coffee-based soak that still gives your dessert the delicious coffee flavor:
- Coffee and Milk Soak: Mix strong brewed coffee with a bit of milk or heavy cream for a smooth, creamy flavor. The milk softens the bitterness of the coffee, making it more palatable for children while still maintaining the essential taste of tiramisu. If you want a sweeter soak, consider adding a small amount of sugar or flavored syrup.
- Chocolate Milk Soak: If your kids aren’t fond of coffee, you can create a chocolate milk soak for a richer, dessert-like flavor. Mix cocoa powder, sugar, and milk to make a chocolate milk soak that will give the ladyfingers a sweet, comforting taste.
3. Use Kid-Friendly Toppings for a Fun Twist
While traditional tiramisu often features a dusting of cocoa powder or shaved chocolate, there are other toppings that can make the dessert more appealing to kids. Here are some creative ideas:
- Sprinkles or Colored Sugar: Instead of cocoa powder, top your alcohol-free tiramisu with fun sprinkles or colored sugar. This will make the dessert more festive and visually appealing for children.
- Chocolate Chips or Mini Marshmallows: Add some extra sweetness and texture with chocolate chips or mini marshmallows. Both are sure to catch the eye of kids and make the tiramisu feel more like a treat.
- Whipped Cream or Frosting: For a creamy, sweet finish, top your kid-friendly tiramisu with a dollop of whipped cream or vanilla frosting. This adds a light, airy texture that will appeal to kids’ tastes, and it can be fun to decorate the top with a piping bag for an extra touch.
4. Keep the Texture Soft and Kid-Friendly
Kids often prefer a smoother texture, so it’s important to pay attention to the consistency of the mascarpone filling and the coffee-soaked ladyfingers. Here are a few tips to achieve the perfect texture:
- Whip the Cream Well: To create a light, fluffy filling, make sure to whip the heavy cream or whipped topping thoroughly before mixing it with the mascarpone cheese. This will give the dessert a soft, airy texture that kids find more appealing.
- Soak Ladyfingers Lightly: When soaking the ladyfingers in the coffee (or coffee syrup), be careful not to soak them too much. You want them to absorb enough liquid to become soft but not soggy. Kids may have a preference for a firmer, more cake-like texture rather than a mushy one.
- Use a No-Bake Approach: Since tiramisu is a no-bake dessert, the layers of mascarpone and coffee-soaked ladyfingers will naturally come together to form a smooth and creamy texture. Allow the dessert to chill for a few hours, which helps the layers set and firm up nicely.
5. Adjust the Sweetness for Kids
Kids generally have a sweeter tooth than adults, so you may want to adjust the sweetness level to match their preferences. Here’s how you can do that:
- Increase Sugar in the Filling: Add a little extra sugar to the mascarpone filling to make it sweeter. Start by adding a tablespoon at a time and taste as you go until you reach the desired level of sweetness.
- Use Sweetened Whipped Cream: You can opt for sweetened whipped cream or cool whip for the creamy layer to add an extra touch of sweetness. This will enhance the overall flavor of the tiramisu and make it more appealing to children.
- Consider Using Sweetened Condensed Milk: If you want to skip adding sugar altogether, you can incorporate sweetened condensed milk into the mascarpone mixture. This will add both sweetness and creaminess in one go, making it easier to adjust the flavor to your liking.
Conclusion
Making a kid-friendly, alcohol-free tiramisu is easy and fun, and the best part is that you can still create a dessert that’s just as delicious and indulgent as the traditional version. By substituting the alcohol with coffee syrup or flavored extracts, choosing the right soaking liquids, and using playful toppings, you can ensure that the dessert remains a hit with children while maintaining the authentic flavors of tiramisu. Whether you serve it at a family gathering or just as a fun treat for your little ones, this version will be a guaranteed crowd-pleaser!
Storing and Freezing Your Eggless Tiramisu for Freshness
Tiramisu is a delicious dessert that’s best enjoyed fresh, but knowing how to store and freeze it properly ensures that you can enjoy its rich, creamy goodness for longer. Whether you have leftover tiramisu or you’re preparing it in advance for a special occasion, here’s everything you need to know about storing and freezing eggless tiramisu to maintain its freshness and flavor.
1. How to Store Eggless Tiramisu in the Refrigerator
Eggless tiramisu is a no-bake dessert that requires proper refrigeration to maintain its creamy texture and prevent spoilage. Here’s how to store it effectively:
- Cover Properly: After assembling the tiramisu, cover the dish with plastic wrap or aluminum foil to prevent it from absorbing any odors in the refrigerator. If you’re using a container with a lid, you can simply close it tightly to keep the freshness locked in.
- Storage Time: Eggless tiramisu can be stored in the refrigerator for up to 3 to 4 days. The dessert will actually improve in flavor over time as the flavors meld together. The ladyfingers absorb more of the coffee and cream filling, making the dessert even more delicious with each passing day.
- Don’t Overload the Layers: When storing tiramisu, try to avoid stacking layers too high. This can cause the dessert to lose its shape and texture. Instead, keep it at a moderate height to ensure even layering and better preservation.
2. Can You Freeze Eggless Tiramisu?
Yes, you can freeze eggless tiramisu! Freezing is a great option if you want to prepare it ahead of time or preserve leftovers for a longer period. Here’s how to do it:
- Use an Airtight Container: The key to freezing tiramisu is using an airtight container. Ensure the container is freezer-safe, as this will prevent ice crystals from forming inside, which could alter the texture and flavor.
- Wrap in Plastic or Foil: Before placing it in an airtight container, it’s best to wrap the tiramisu in plastic wrap or aluminum foil. This additional layer of protection ensures that the dessert remains sealed off from the air, preventing freezer burn and maintaining the creamy texture.
- Freezing Time: You can freeze eggless tiramisu for up to 2 months. If you plan on freezing it for a longer period, consider slicing the tiramisu into individual portions so that you can thaw only what you need without defrosting the whole dessert.
3. Thawing Frozen Eggless Tiramisu
When you’re ready to enjoy your frozen tiramisu, it’s important to thaw it correctly to avoid compromising the texture. Here’s how to do it:
- Thaw in the Refrigerator: The best method for thawing tiramisu is by placing it in the refrigerator for 6 to 8 hours, or overnight. This allows the dessert to thaw slowly and evenly while keeping the creamy filling smooth.
- Avoid Thawing at Room Temperature: It’s not recommended to thaw tiramisu at room temperature because it can cause the dessert to become too soft, and the filling may separate. Thawing in the refrigerator is the safest way to maintain the texture and flavor.
- Serve After Thawing: Once thawed, the tiramisu can be served immediately. If you want to freshen it up before serving, consider adding a light dusting of cocoa powder or chocolate shavings to restore its presentation.
4. Can You Freeze the Coffee-Soaked Ladyfingers?
If you’ve already soaked your ladyfingers in coffee and assembled the tiramisu, it’s still fine to freeze the dessert as a whole. However, if you prefer to freeze the coffee-soaked ladyfingers separately, it’s a good idea to store them in an airtight container after they’ve been soaked in the coffee mixture. Here’s how to do it:
- Soak the Ladyfingers: Dip the ladyfingers in your coffee or coffee syrup mixture as you normally would. After they’re soaked, lay them out in a single layer on a baking sheet and freeze for about 1-2 hours.
- Store in a Freezer Bag: Once frozen, transfer the ladyfingers to a zip-top freezer bag or airtight container. Label the bag with the date so you know when to use them.
- Thawing Soaked Ladyfingers: To use the frozen ladyfingers, let them thaw in the refrigerator for several hours before assembling the tiramisu. You can also allow them to come to room temperature if you prefer a faster thaw.
5. Reassembling After Freezing
When you’ve thawed your eggless tiramisu or the individual components, the process of reassembling it is straightforward. If the tiramisu has separated during freezing or thawing, just give it a gentle stir to bring the cream filling and coffee layers back together. You may want to freshen up the dessert with a topping of whipped cream, chocolate shavings, or extra cocoa powder to restore its original appeal.
6. Tips for Maintaining Texture and Flavor
- Avoid Re-Freezing: Once tiramisu has been thawed, do not refreeze it. Doing so can cause the dessert to lose its texture, as the ingredients may break down when frozen and thawed multiple times.
- Add Fresh Layers: If you find that the tiramisu’s texture has softened too much after freezing and thawing, you can add a fresh layer of whipped mascarpone filling or cocoa powder before serving. This can help revitalize the dessert and make it taste just as fresh as when it was first made.
Conclusion
Storing and freezing eggless tiramisu is an excellent way to prolong the enjoyment of this delightful dessert. With the right storage techniques and a few tips for freezing and thawing, you can enjoy tiramisu whenever you like without compromising on its texture and flavor. Whether you’re preparing it in advance for a special event or saving leftovers, these methods ensure your tiramisu stays delicious, creamy, and fresh for days or even weeks.
Common Mistakes That Ruin Egg-Free Tiramisu (And How to Fix Them!)
Over-Soaking or Under-Soaking Ladyfingers – Getting the Right Balance
The ladyfingers in tiramisu play a pivotal role in achieving that perfect texture, soaking up the coffee and cream mixture while maintaining their structure and contributing to the dessert’s overall flavor. However, the process of soaking them requires just the right balance. Soaking them too much or too little can result in a tiramisu that either falls apart or lacks the proper flavor depth. Here’s a deeper dive into how to get it right.
1. What Happens When You Over-Soak Ladyfingers?
Over-soaking ladyfingers in the coffee mixture can lead to a soggy, mushy texture that ruins the dessert’s overall structure. While tiramisu is supposed to be creamy, it’s important to keep a balance. Here’s what can happen when you soak the ladyfingers too much:
- Soggy Ladyfingers: When the ladyfingers are over-soaked, they absorb too much liquid and lose their firmness. As a result, they can collapse under the weight of the cream filling, creating a dish that lacks the layers and textures typical of a good tiramisu. The ladyfingers should still maintain some of their shape and provide a little resistance when you bite into them.
- Flavor Dilution: Ladyfingers that are too soaked can also dilute the flavors. The coffee and liquor mixture can lose its bold, rich taste when the ladyfingers absorb too much, making the tiramisu flavorless or overly watery.
- Mushy Layers: If you soak the ladyfingers for too long, the layers of tiramisu will become mushy, making it difficult to distinguish between the different components of the dessert. The crisp, lightly saturated ladyfingers should act as a base that contrasts with the creamy mascarpone filling, but over-soaking removes this crucial textural contrast.
2. What Happens When You Under-Soak Ladyfingers?
On the flip side, under-soaking the ladyfingers can cause them to remain dry and hard in the final dessert. Here’s how under-soaking affects your tiramisu:
- Dry Ladyfingers: If the ladyfingers aren’t soaked enough, they won’t absorb the coffee and cream mixture as intended. Instead of softening and taking on the rich, aromatic flavor of the coffee, they’ll stay dry and crunchy. This can create an unpleasant contrast with the creamy filling, making the tiramisu less enjoyable.
- Lack of Flavor Absorption: Ladyfingers that aren’t soaked enough will also fail to absorb the bold coffee and liquor mixture. As a result, the flavor will be less vibrant. The contrast between the creamy mascarpone and the coffee-soaked ladyfingers is one of the highlights of tiramisu, and insufficient soaking compromises this balance.
- Poor Layering: Under-soaked ladyfingers don’t layer well, making it hard to assemble the tiramisu properly. They may also break or crumble apart when trying to stack them, which affects the dessert’s overall presentation and texture.
3. The Right Way to Soak Ladyfingers for Tiramisu
Now that we know the risks of over-soaking and under-soaking, how can you achieve that perfect balance? Here are some tips to help you get it right:
- Quick Dips: Ladyfingers should be dipped quickly into the coffee mixture – just about 1 to 2 seconds per side. This quick soak allows them to absorb enough coffee and flavor without becoming soggy. Don’t let them sit in the liquid for too long, as they’ll continue absorbing it even after being removed.
- Temperature Matters: The coffee should be at room temperature or slightly warm when soaking the ladyfingers. If the coffee is too hot, it will cause the ladyfingers to become too soft too quickly. On the other hand, cold coffee won’t allow them to absorb enough flavor. Aim for a moderate temperature to get the perfect soak.
- Testing a Ladyfinger: If you’re unsure whether you’ve soaked the ladyfingers correctly, you can test one by pressing it lightly. It should feel soft and slightly pliable but not falling apart. The ladyfinger should hold its shape but easily give in to the cream mixture.
4. Finding the Right Coffee-Liquor Ratio
The flavor of the coffee and the liquor (if you’re using it) is crucial in the soaking process. A balanced ratio of coffee to liquor (usually masala wine, rum, or marsala) will help ensure that the ladyfingers absorb just the right amount of flavor. If you find that the ladyfingers are not absorbing enough flavor, you can slightly increase the amount of liquor. But always remember, too much alcohol can overpower the dessert and make it too moist.
- Coffee-to-Liquor Ratio: Typically, a good balance is around 2 parts coffee to 1 part liquor, but feel free to adjust based on your flavor preferences.
5. How to Layer Perfectly Soaked Ladyfingers in Tiramisu
Once your ladyfingers are properly soaked, it’s important to layer them correctly in your tiramisu dish. Here’s how to do it:
- Even Distribution: Arrange the soaked ladyfingers in a single, even layer on the bottom of your dish. Don’t overcrowd the dish, and leave some space between the ladyfingers to prevent them from sticking together and losing their structure.
- Alternating Layers: After the first layer of soaked ladyfingers, add a generous layer of mascarpone cream filling. Repeat this process until you’ve filled the dish, ensuring that you end with a layer of the creamy filling on top. The balance between soaked ladyfingers and cream is key to a perfect tiramisu.
- Top Layer: You can finish the tiramisu with a dusting of cocoa powder, chocolate shavings, or even coffee beans for added texture and flavor.
Conclusion
Achieving the perfect balance of soaked ladyfingers is essential to making a delicious tiramisu. Over-soaked ladyfingers lead to a soggy dessert, while under-soaked ones create dryness and lack flavor. By following these simple tips—quick dips, the right coffee temperature, and the ideal soaking time—you can ensure that your tiramisu has just the right texture. The ladyfingers should absorb enough flavor to enhance the creamy filling but still maintain their structural integrity, giving your tiramisu the perfect texture and flavor every time.
Using Low-Quality Mascarpone or Coffee – Why Ingredients Matter
When making a classic Italian dessert like tiramisu, the quality of your ingredients is crucial to achieving that rich, authentic flavor and creamy texture. While the recipe itself may seem simple, even the slightest variation in ingredient quality can affect the overall result. Two of the most important ingredients in tiramisu are mascarpone cheese and coffee, and choosing low-quality versions of these can lead to disappointing results. Let’s explore why these ingredients matter and how they influence the final dish.
1. The Importance of High-Quality Mascarpone Cheese
Mascarpone cheese is the star of the creamy filling in tiramisu. Its rich, velvety texture and subtle sweetness are what give tiramisu its signature smoothness. When you use low-quality mascarpone, the texture and flavor will suffer. Here’s why:
- Texture Issues: Low-quality mascarpone can be watery, grainy, or clumpy, which compromises the smoothness of the cream. Tiramisu is meant to have a luxurious, melt-in-your-mouth consistency. A poor-quality mascarpone won’t blend seamlessly into the mixture, resulting in an uneven or lumpy filling.
- Flavor Deficiency: The flavor of mascarpone is supposed to be mild, slightly sweet, and creamy. When using a subpar mascarpone, the flavor may be overly sour or bland, disrupting the delicate balance of sweetness and richness that tiramisu requires. The flavor of a low-quality mascarpone can overpower the other ingredients or leave the dessert tasting flat and unbalanced.
- Richness and Creaminess: The key to a perfect tiramisu is that it’s creamy but not too heavy. High-quality mascarpone provides the right level of richness without making the dessert feel too dense. Cheaper mascarpone tends to be thinner or more acidic, which can lead to an overly runny or tart filling.
Tip: Always opt for fresh, well-known mascarpone brands or, if possible, look for mascarpone that is made with traditional methods. Check the label for quality assurance and avoid cheaper, mass-produced mascarpone.
2. Why Coffee Quality Makes a Difference
Coffee is another essential element of tiramisu, as it imparts depth and complexity to the dessert’s flavor. The coffee-soaked ladyfingers play a crucial role in balancing the sweetness and creaminess of the mascarpone. Using low-quality coffee or pre-made coffee mixtures can drastically affect the flavor profile of your tiramisu.
- Weak or Watery Coffee: Low-quality coffee or instant coffee often results in a weak, diluted flavor. Since tiramisu relies on coffee as one of its primary flavoring agents, using coffee that lacks richness can leave the dessert tasting flat. The coffee should be bold, aromatic, and have a full-bodied flavor to contrast the sweetness of the mascarpone and the subtle bitterness of the cocoa powder. A watery coffee will lack the intensity needed to create the signature tiramisu flavor.
- Off-Flavors: Low-grade coffee, especially pre-ground or instant varieties, often has a stale or overly bitter taste that doesn’t complement the other ingredients. When soaking the ladyfingers, the coffee’s flavor will soak through them, influencing the overall taste. A bad coffee choice can overwhelm the other flavors and make the tiramisu taste unpleasant.
- Imbalanced Flavor: Tiramisu is a delicate balancing act between the sweet mascarpone, the bitter coffee, and the creamy texture. If the coffee flavor is too weak or too strong, it disrupts this balance. Good quality coffee gives the dessert a rich, harmonious flavor that makes every bite a perfect blend of creamy sweetness and bold bitterness.
Tip: Use freshly brewed, strong coffee or espresso made from high-quality beans. Avoid instant coffee, which often has a flat or artificial taste. Espresso offers the best flavor for tiramisu, but strong brewed coffee is an excellent alternative if you don’t have access to an espresso machine.
3. The Role of Other Ingredients in Quality
While mascarpone and coffee are the primary ingredients that determine the flavor and texture of tiramisu, other ingredients also play a role in the final result. For example:
- Ladyfingers: Use good-quality ladyfingers that are fresh and crisp. Low-quality or stale ladyfingers absorb liquid unevenly, resulting in an inconsistent texture in the final dessert.
- Sugar and Liquor: High-quality, pure sugar and alcohol (like Marsala wine or rum) can enhance the flavor complexity of tiramisu. Cheaper, artificial flavoring can introduce unwanted aftertastes that detract from the dessert’s quality.
4. How Low-Quality Ingredients Affect the Overall Experience
Using low-quality mascarpone or coffee doesn’t just affect the flavor and texture—it affects the overall experience of enjoying tiramisu. Tiramisu is meant to be a luxurious dessert, an indulgence that blends a variety of rich, decadent flavors. When you use low-quality ingredients, it can result in a dessert that’s underwhelming and lacking in depth.
- Texture Problems: As mentioned earlier, poor mascarpone will create a lumpy or runny filling, and low-quality coffee leads to a thin, watery soak for the ladyfingers. These issues will create a final dish that lacks the signature creamy, melt-in-your-mouth texture of a true tiramisu.
- Flat Flavors: Low-quality ingredients lead to a lack of complexity in flavor. A great tiramisu should have layers of taste—sweetness from the mascarpone, bitterness from the coffee, and richness from the mascarpone and liquor. If these ingredients don’t shine in their full glory, the dessert becomes one-dimensional, and the layers are no longer distinct.
5. How to Ensure You’re Using High-Quality Ingredients
To avoid the pitfalls of low-quality ingredients, here are a few tips:
- Choose Fresh Mascarpone: Look for mascarpone that’s fresh, preferably from a reputable dairy brand. If available, try to buy mascarpone that’s made locally or imported from Italy, where traditional methods are used.
- Brew Your Own Coffee: Always brew your own fresh coffee or espresso using high-quality beans. Avoid the convenience of instant coffee, as it doesn’t offer the depth and richness needed for a perfect tiramisu.
- Use Quality Liquors: If you’re adding liquor like Marsala, rum, or coffee liqueur, opt for good-quality brands that enhance the flavor rather than overwhelm it with artificial or harsh notes.
Conclusion
The quality of ingredients, especially mascarpone cheese and coffee, can make or break your tiramisu. Using fresh, high-quality mascarpone ensures that your dessert will have the smooth, rich texture that defines a perfect tiramisu. Likewise, brewing fresh, strong coffee guarantees that the flavor will be bold enough to complement the sweetness of the mascarpone. By prioritizing the quality of these key ingredients, you’ll be well on your way to creating a tiramisu that’s as authentic and delicious as it is indulgent.
For a traditional tiramisu recipe to achieve a rich and authentic flavor, check out How to Pick the Best Tiramisu Ingredients for a Rich and Creamy Dessert for an irresistible experience.
Skipping the Chilling Step – How Long Should Tiramisu Set?
Chilling is a crucial step in making tiramisu, yet it’s often the most overlooked or rushed. While the process may seem like an extra, unnecessary step when you’re eager to enjoy your dessert, skipping or shortening the chilling time can have a major impact on the flavor, texture, and overall quality of your tiramisu. Here’s why chilling is so important and how long you should actually let your tiramisu set for the best results.
1. The Importance of Chilling Tiramisu
The chilling step allows the flavors to meld together and the dessert to set, giving it the smooth, creamy texture that makes tiramisu so indulgent. When tiramisu is refrigerated, the flavors have time to develop and infuse the layers, which makes every bite taste richer and more harmonious.
- Flavor Development: Tiramisu relies on several contrasting flavors—sweet mascarpone, bitter coffee, and sometimes a splash of liquor. Chilling helps these flavors to blend together, ensuring that no single flavor dominates and that the dessert has a balanced taste. Without this resting time, the coffee might taste too strong, or the mascarpone may not be fully integrated with the other ingredients.
- Texture and Firmness: Tiramisu needs time to firm up. If you try to serve it immediately after assembling, the layers may still be too soft or runny. The mascarpone filling needs time to set and thicken, while the ladyfingers should fully absorb the coffee and flavors, creating the ideal texture—smooth, creamy, and firm enough to hold its shape when sliced.
2. How Long Should Tiramisu Set in the Fridge?
The ideal chilling time for tiramisu is a minimum of 4 hours, but to get the best results, it’s recommended to chill it overnight (at least 8 hours). Here’s why this time frame is essential:
- 4 Hours: After 4 hours of chilling, the tiramisu should have enough time to set its shape and for some of the flavors to meld. It may not be as fully developed as an overnight version, but it’s a reasonable option if you’re in a pinch. The texture will be better than if you skip chilling altogether, but it might still feel a little too soft or lack the depth of flavor.
- 8 Hours or More: Letting your tiramisu chill for at least 8 hours is the golden rule for getting the perfect dessert. During this time, the mascarpone filling will fully firm up, the ladyfingers will become tender and well-soaked without being soggy, and the coffee flavor will have a chance to permeate every layer. The tiramisu will hold its shape when sliced, and the flavors will be well-balanced and more complex.
- Overnight: For the best, most authentic results, chilling tiramisu overnight is highly recommended. Giving it 12 hours or more ensures that it’s completely set and ready to serve, making the dessert’s texture smooth, the layers distinct, and the flavors fully developed.
3. What Happens if You Skip Chilling or Don’t Let Tiramisu Set Long Enough?
While you might be tempted to skip the chilling step to enjoy your tiramisu sooner, doing so can significantly impact the texture and flavor. Here’s what can go wrong:
- Runny or Soft Texture: Without enough chilling time, the mascarpone filling may not have enough time to firm up, resulting in a runny, unstructured dessert. This can make it difficult to slice the tiramisu and can affect the experience of eating it.
- Soggy Ladyfingers: The ladyfingers need time to absorb the coffee and the other flavors. If they don’t have enough time to soak properly, they can either become soggy or stay too dry. Both outcomes affect the texture of the tiramisu, making it less enjoyable to eat.
- Underdeveloped Flavors: Flavors in tiramisu evolve during the chilling process, so skipping or rushing the chilling step means you’ll miss out on the depth and complexity that come from the flavors blending together. The dessert may taste more like its individual components (coffee, mascarpone, etc.) rather than a balanced whole.
4. How to Tell If Tiramisu Is Ready to Serve
If you’re unsure if your tiramisu has chilled long enough, you can test it by gently pressing the surface. Here’s what to look for:
- Firmness: The top should feel firm to the touch and not sink when pressed. If the top layer feels squishy or moves around too much, it likely needs more chilling time.
- Set Layers: When you slice into the tiramisu, the layers should hold their shape and not run or ooze. If the layers collapse or are too soft, the dessert needs additional time in the fridge.
- Flavor Balance: After the chilling period, give your tiramisu a taste. If it’s well-chilled, the flavors should be perfectly balanced and the texture should be smooth and creamy. If it’s still too coffee-heavy or too sweet, it may need a bit more time to rest and develop.
5. Can You Chill Tiramisu Too Long?
While it’s hard to over-chill tiramisu (especially if you’re leaving it overnight), it’s best not to store it in the fridge for more than 2-3 days. After this period, the texture may begin to deteriorate, and the ladyfingers may become too soft or mushy. For optimal flavor and texture, aim to serve tiramisu within 1-2 days after chilling.
However, chilling it for 24-48 hours usually enhances its flavor and texture, so it’s a perfect window for this dessert.
6. Tips for Quick Chilling
If you’re short on time and need to chill your tiramisu faster, here are a few tricks you can try:
- Chill in Smaller Portions: If possible, divide the tiramisu into individual servings and chill them separately. Smaller portions chill faster than a large dish of tiramisu.
- Place It in a Shallow Dish: Using a shallow, wide dish will help the dessert chill more quickly than a deep, narrow one. The more surface area exposed to the cold, the faster it will set.
- Refrigerate Immediately: After assembling the tiramisu, cover it tightly with plastic wrap or a lid and refrigerate it immediately. Avoid leaving it out at room temperature, as this can prevent the dessert from setting properly.
Conclusion
Chilling your tiramisu is not just a suggestion—it’s a crucial step to achieve the perfect texture and flavor. Whether you let it set for 4 hours or overnight, giving the tiramisu time to rest in the fridge will elevate the dessert to its full potential. Skipping this step can result in a disappointing texture and underdeveloped flavors, so be sure to give your tiramisu the time it needs to set and chill for the best experience.
Serving Too Soon – Why Patience Creates the Best Texture
When you’ve spent time carefully assembling your tiramisu, the excitement to taste it immediately can be overwhelming. However, patience truly pays off in the world of desserts like tiramisu. The timing between assembling and serving can make or break the final result, especially when it comes to achieving the perfect texture. Here’s why allowing your tiramisu to rest before serving is so important, and how serving too soon can affect the overall experience.
1. Why Waiting is Key to the Perfect Tiramisu Texture
Tiramisu is a dessert that relies on the careful balance between its creamy filling, tender ladyfingers, and rich coffee flavor. These components need time to properly meld together. Here’s how waiting enhances the texture:
- Creamy Filling Set: The mascarpone cream layer needs time to firm up in the fridge. This gives the tiramisu its signature smooth, rich, and creamy texture. When you serve it too soon, the mascarpone filling might still be soft and runny, which can result in a less satisfying experience. The filling should hold its shape when sliced, so you get that luscious bite rather than a soupy mess.
- Absorption of Coffee: The ladyfingers, when soaked in coffee, need time to fully absorb the liquid and become soft and tender without turning soggy. If served too soon, the coffee might still sit on the surface, making the dessert feel dry or uneven. When allowed to rest, the coffee-soaked ladyfingers transform into a soft, melt-in-your-mouth texture that complements the creamy mascarpone filling.
- Layering and Cohesion: Tiramisu is all about its layers, but these layers need time to bind together. If you cut into it too soon, the layers might not have fully set, causing them to separate or collapse. Giving the dessert time to rest allows the layers to hold their structure and the flavors to come together in perfect harmony.
2. The Impact of Immediate Serving on Flavor
While the texture is important, flavor development is another reason to wait before serving. Here’s why patience is crucial for the taste:
- Flavor Integration: Tiramisu relies on multiple layers of flavor—the bitter coffee, the creamy mascarpone, and the sweetness of sugar. When served too soon, these flavors may not have fully integrated. By allowing tiramisu to rest, the flavors have time to mellow and blend. The coffee is absorbed into the ladyfingers, and the mascarpone cream becomes more cohesive with the other ingredients. This results in a more balanced and rich flavor profile.
- Alcohol and Coffee Infusion: If your tiramisu includes alcohol like rum or coffee liqueur, chilling it allows the alcohol to infuse into the dessert without being overpowering. Serving too soon means the alcohol can taste sharp and stand out too much, rather than blending seamlessly into the dessert.
3. The Ideal Resting Time for Tiramisu
While it’s tempting to dive right into your creation, giving your tiramisu the right amount of time to rest is essential for achieving that perfect texture and flavor. Here’s the breakdown of ideal resting times:
- 4 Hours Minimum: At the very least, allow your tiramisu to chill for 4 hours. This will give the mascarpone filling time to firm up and the ladyfingers time to absorb the coffee. However, while 4 hours can work in a pinch, the dessert will taste better if you allow it to rest longer.
- 8 Hours to Overnight: For the best results, aim for 8 hours or overnight. This gives ample time for all the flavors to meld, and the texture will be at its peak—creamy, firm, and indulgent. The tiramisu will hold its shape when sliced and be a joy to eat.
- Longer Resting Times: If you can wait even longer (within reason), tiramisu can actually improve in flavor as it sits in the fridge for up to 24 hours. The flavors will become more harmonious, and the texture will be smooth and rich.
4. What Happens if You Serve Tiramisu Too Soon?
If you serve tiramisu too soon, you may encounter a number of issues, especially in terms of texture:
- Soggy Ladyfingers: The ladyfingers might not have had time to soak up the coffee properly, leading to a soggy or uneven texture. This can make parts of the tiramisu too soft or mushy, while others remain too dry.
- Loose Filling: The mascarpone filling may still be too soft, leading to a runny or soupy dessert. This can make it difficult to cut clean slices, and the creamy texture won’t be as velvety as it should be.
- Inconsistent Layers: If the dessert hasn’t had enough time to set, the layers might fall apart when you try to slice them, creating a messy presentation. The layers need time to bond together, and serving it too early can compromise that.
- Undeveloped Flavor: The flavors in tiramisu need time to blend, so serving it too soon can result in a dessert that tastes disconnected. The coffee might be too strong, or the sweetness of the mascarpone could overpower the other flavors. Giving it time to set ensures a harmonious balance.
5. How to Tell When Your Tiramisu is Ready to Serve
If you’re unsure whether your tiramisu is ready to serve, there are a few signs you can look for:
- Firmness of Layers: When you press down gently on the top of the tiramisu, the layers should feel firm and slightly bouncy. If they feel too soft or sink under pressure, it likely needs more chilling time.
- Clean Slices: When you cut into your tiramisu, the slices should hold their shape. If the dessert falls apart or runs, it’s a sign it needs to chill for longer.
- Balanced Flavor: After resting, the flavors should be well-integrated, with the bitterness of the coffee balanced by the creaminess of the mascarpone. If the flavors taste too strong or harsh, the tiramisu likely needs more time in the fridge.
6. Can You Speed Up the Resting Process?
If you’re really pressed for time, here are a few ways to speed up the chilling process without sacrificing too much of the quality:
- Use Smaller Portions: If you divide the tiramisu into smaller servings, they will chill faster. Individual portions will set quicker than a large pan.
- Spread the Dessert in a Shallow Dish: A shallow, wide dish will chill more quickly than a deep, narrow one. This exposes more surface area to the cold, speeding up the chilling process.
- Quick Chilling in the Freezer: If you need the tiramisu ready in a hurry, you can place it in the freezer for 30 minutes to 1 hour, but make sure to return it to the fridge for the remaining chilling time to ensure the proper texture.
Conclusion
This egg-free tiramisu recipe offers a fantastic alternative to the traditional version, making it ideal for those who prefer to avoid raw eggs for safety, dietary, or convenience reasons. With rich layers of mascarpone cream, perfectly soaked ladyfingers, and a touch of cocoa powder, you can enjoy all the delicious flavors and creamy texture of the classic dessert without the raw eggs. Plus, it’s incredibly simple to make at home, ensuring that everyone can enjoy this indulgent treat.
We hope this recipe inspires you to give egg-free tiramisu a try. It’s a great way to enjoy a beloved dessert with a twist! Once you make it, don’t forget to share your thoughts or any fun variations you’ve tried in the comments below. We’d love to hear about your experience and any creative additions you’ve made to this classic dessert. Let’s continue the conversation—share your favorite tiramisu tips and variations with us!